To clean a refrigerator door seal (also called a fridge gasket), wipe it with a warm soapy water solution, use a soft toothbrush for dirt inside the folds, and dry it completely. For black mold, apply a 50/50 white vinegar and water mix, scrub gently, and dry thoroughly. Always check the seal afterward for cracks or gaps that allow cold air to escape.
A dirty fridge door seal is easy to overlook, until you notice warm food, frost buildup, unusual condensation, or your refrigerator running constantly. The rubber gasket around the door keeps cold air inside, but it collects food particles, moisture, mold, and mildew over time.
The good news is that cleaning a refrigerator gasket does not require special tools. With the right method and common household supplies, you can remove mold, improve sealing performance, and help your appliance run more efficiently in under 20 minutes.
Important — Do Not Use Bleach. Bleach degrades rubber gaskets over time, causing cracking and premature failure. Bleach fumes can also contaminate food stored inside the fridge. Use white vinegar or mild dish soap instead both are safe, effective, and widely available in the USA, UK, Canada, and Australia.
Why a Dirty Fridge Door Seal Matters
The refrigerator door seal may look like a simple rubber strip, but it plays a critical role in temperature control. When the gasket becomes dirty, moldy, or damaged, the door may not close tightly — and that has real consequences:
- Cold air escapes, forcing the compressor to run more often
- Energy bills rise because the fridge works harder than it should
- Food may spoil faster due to inconsistent internal temperatures
- Frost or condensation builds up around the door frame
- The compressor wears out faster, shortening the life of the appliance
Moisture is the main reason mold and mildew appear on fridge door seals. Spills, condensation, and trapped moisture inside the gasket folds create exactly the conditions mold needs to grow.

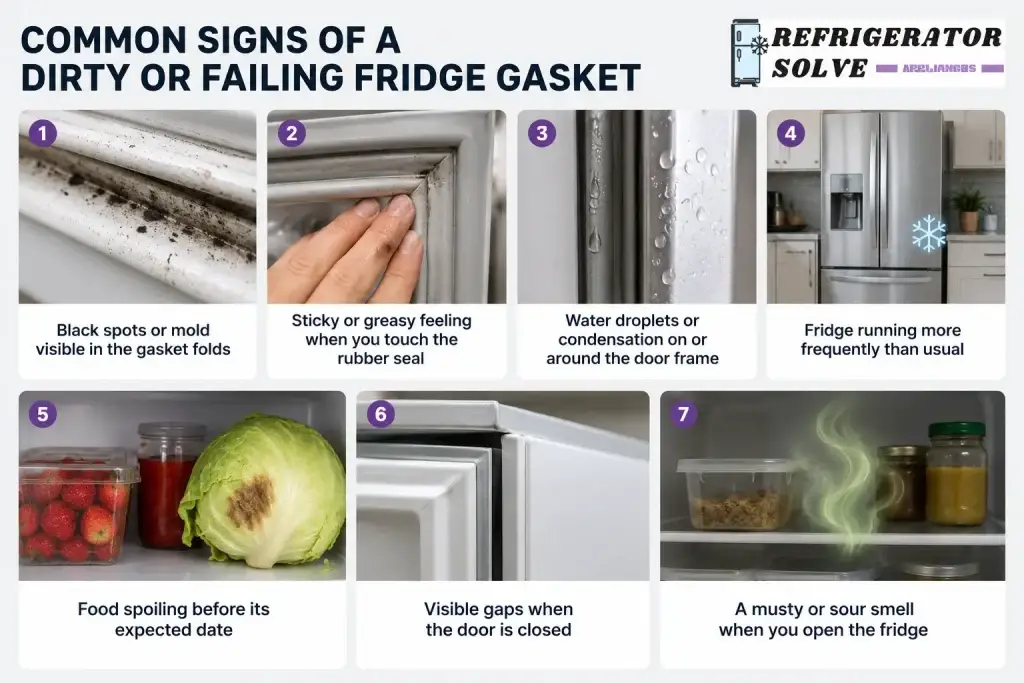
Common Signs of a Dirty or Failing Fridge Gasket
- Black spots or mold visible in the gasket folds
- Sticky or greasy feeling when you touch the rubber seal
- Water droplets or condensation on or around the door frame
- Fridge running more frequently than usual
- Food spoiling before its expected date
- Visible gaps when the door is closed
- A musty or sour smell when you open the fridge
What You Will Need
| Item | Purpose | Where to Find It |
|---|---|---|
| Microfiber cloth (x2) | Wiping and drying the gasket | Any supermarket — Walmart, Tesco, Coles, Canadian Tire |
| Mild dish soap | General cleaning solution | Any supermarket |
| White vinegar | Mold and mildew removal | Any supermarket — typically under $2 / £1.50 / AU$2 |
| Baking soda | Stubborn stains and odor removal | Any supermarket |
| Soft toothbrush or small brush | Scrubbing inside gasket folds | Chemist, dollar store, pound shop |
| Small bowl | Mixing cleaning solution | Any kitchen cupboard |
| Dry towel | Final drying step | Any linen cupboard |
Best Cleaning Methods for Refrigerator Door Seals


Step-by-Step Guide: How to Clean a Refrigerator Door Seal Properly
- Open the door fully for access. Pull the fridge door all the way open so you can see and reach every section of the gasket, including the top corners.
- Remove loose debris first. Use a dry cloth or soft brush to sweep out any crumbs, food particles, or loose dirt trapped in the gasket folds before applying any liquid.
- Prepare your cleaning solution. For general cleaning: 1 tsp dish soap in 1 cup warm water. For mold: equal parts white vinegar and warm water.
- Wipe the entire gasket surface. Work your way around the full perimeter of the door — top, sides, and bottom. Pay extra attention to the corners where mold often hides.
- Scrub inside the folds with a toothbrush. Gently open each fold and scrub inside. This is where most mold and food residue accumulates.
- Wipe away all cleaning residue. Use a fresh damp cloth to remove all soap or vinegar from the gasket surface.
- Dry completely — this step is essential. Use a dry towel to remove all moisture. A damp gasket will grow mold again within days. For a thorough job, leave the door slightly ajar for 15 minutes.
- Inspect the gasket for damage. Run your finger along the full length of the seal. Feel for cracks, tears, hard spots, or sections that no longer lie flat against the door frame.
- Perform the paper test. Close the door on a sheet of paper. If it slides out freely on any side, the seal may need further attention or replacement.
- Check your fridge temperature settings. Keep the fridge at 37°F (3°C) and the freezer at 0°F (-18°C) for optimal food safety and energy efficiency.
Expert Tips for a Perfect Result
- Clean monthly as standard. Monthly cleaning prevents mold from establishing itself in the gasket folds. It takes less than 10 minutes when done regularly.
- Always dry completely. This is the most important step. More mold infestations come from a damp gasket after cleaning than from skipping cleaning entirely.
- Use a toothbrush — not a sponge. A sponge cannot reach inside the narrow folds of the gasket. An old soft-bristle toothbrush is the right tool for the job.
- Clean the door frame too. The metal or plastic surface the gasket presses against also collects residue. Wipe the fridge door frame with the same solution for a better overall seal.
- Check door alignment if cleaning does not help. If the fridge still loses cold air after a thorough cleaning, the door hinges may be misaligned. Adjustable hinges can sometimes be corrected by hand — consult your fridge manual.
- Keep food containers sealed. Unsealed containers release moisture and food particles that accelerate mold growth on the gasket.
Common Mistakes to Avoid
Never use bleach on a fridge gasket. It weakens and degrades rubber over time, causes premature cracking, and releases fumes that can contaminate stored food.
- Scrubbing too aggressively. Rough brushes or abrasive pads create tiny cuts in the rubber where moisture enters and mold takes hold. Always use soft bristles.
- Leaving moisture behind after cleaning. Skipping the drying step is the most common reason mold returns quickly. Dry every fold thoroughly.
- Using sharp tools to remove debris. Knives, skewers, or toothpicks can puncture or tear the gasket. Use a soft brush instead.
- Ordering a replacement gasket without checking the model number. Refrigerator gaskets are model-specific. An incorrect gasket will not seal properly regardless of how carefully it is fitted.
- Ignoring the door frame. Cleaning only the gasket but not the surface it presses against leaves residue that prevents a proper seal.
When to Replace the Fridge Door Seal
Cleaning can restore a dirty or slightly stiff gasket, but some seals are beyond recovery. Replace your refrigerator door seal if you notice:
- Visible cracks, cuts, or tears in the rubber
- Sections that feel permanently hard and brittle
- The gasket pulling away from the door frame entirely
- The paper test consistently failing even after thorough cleaning
- Condensation or frost buildup that persists after cleaning
How Much Does It Cost to Replace a Refrigerator Door Seal?
If your gasket needs replacing, here are approximate costs across your target markets:

Frequently Asked Questions
How do you remove black mold from a refrigerator door seal?
Apply a 50/50 mix of white vinegar and warm water to the affected areas using a soft toothbrush. Scrub gently inside all gasket folds, then wipe clean and dry completely. For very stubborn mold, apply a baking soda paste and leave it for 5 minutes before scrubbing. Never use bleach, it damages the rubber and the fumes can contaminate food.
How do I test if my fridge door seal is working properly?
Use the paper test: close the fridge door on a single sheet of paper. If the paper slides out with little or no resistance, the seal is failing. A working gasket holds the paper firmly. Repeat this around all four sides of the door to identify which section is leaking.
How often should I clean my refrigerator door seal?
Most households should clean the fridge gasket once a month. If you have young children, cook frequently, live in a humid climate, or notice any musty smell near the door, clean it every two weeks. Regular cleaning takes under 10 minutes and prevents mold from becoming established.
Can a dirty fridge gasket cause higher electricity bills?
Yes. A compromised seal allows cold air to leak out continuously, so the compressor runs longer and more often to maintain the set temperature. This extra workload increases energy consumption and can raise your electricity bill noticeably over time.
How do I revive a refrigerator door seal that feels hard or stiff?
Clean the gasket thoroughly first and dry it completely. Then apply a thin layer of food-safe silicone lubricant or petroleum jelly (Vaseline) to the rubber surface using a soft cloth. This can help restore flexibility in mildly stiffened seals. If the rubber is cracked or brittle, the gasket needs to be replaced.
Is this cleaning method safe for all fridge brands?
Yes. Warm soapy water and diluted white vinegar are safe for rubber gaskets on all major refrigerator brands including Samsung, LG, Whirlpool, Bosch, Fisher & Paykel, Westinghouse, and GE. Always avoid bleach, harsh chemical sprays, and abrasive scrubbers regardless of brand.
How long does a refrigerator door seal last?
A well-maintained fridge gasket typically lasts 5 to 10 years. Regular cleaning, proper drying, and avoiding harsh chemicals significantly extend its lifespan. A gasket that is cleaned monthly and kept free of mold can often last the full life of the appliance.
Where can I buy a replacement fridge gasket in the UK or Australia?
In the UK, eSpares.co.uk and Amazon.co.uk stock gaskets for most brands. In Australia, Appliances Online, Amazon.com.au, and eSpares are reliable sources. In the USA and Canada, AppliancePartsPros.com carries an extensive range. Always use your refrigerator model number to find the correct part.
Conclusion
A clean refrigerator door seal helps your appliance maintain stable temperatures, protect stored food, and operate efficiently. Learning how to clean a fridge gasket properly — and doing it regularly — prevents mold buildup, improves door sealing, and extends the life of your refrigerator.
The key steps are simple: use the right cleaning solution (white vinegar for mold, warm soapy water for general cleaning), work a soft toothbrush into the folds, and always dry the gasket completely afterward. Do the paper test periodically to confirm the seal is still working, and replace the gasket if cleaning is no longer enough.
Take 10 minutes today to inspect your gasket. A small amount of regular maintenance makes a noticeable difference in refrigerator performance, food safety, and energy efficiency — and saves you from a costly repair down the line.

Hi, I’m the lead researcher and appliance enthusiast behind RefrigeratorSolve. With years of hands-on experience troubleshooting cooling systems and testing home appliances, I am dedicated to bringing you honest reviews, energy-saving tips, and practical solutions to keep your refrigerator running perfectly.