Changing a KitchenAid refrigerator filter is usually a straightforward job, but the exact process depends on your refrigerator model and the type of filter it uses. Some filters pull straight out, others need to be turned before removal, and certain KitchenAid refrigerators have the filter hidden behind a door or inside the base grille.
The good news is that you normally do not need any special tools.
In this guide, you will learn how to change KitchenAid refrigerator filters, locate the correct water filter, identify common KitchenAid filter types, flush the new filter, reset the filter light, replace the air filter, and fix common problems that can happen after installation.
Quick answer: To change a KitchenAid refrigerator water filter, locate the filter housing, remove the old cartridge using the method required by your model, install the correct replacement filter, flush the water system thoroughly, check for leaks, and reset the filter-status indicator if your refrigerator has one.
Because filter designs vary, always compare the replacement filter with your existing cartridge and check your refrigerator model number before buying a new one.
What Filters Does a KitchenAid Refrigerator Have?
Depending on the model, your KitchenAid refrigerator may have a water filter, an air filter, or both.
Water Filter
The refrigerator water filter treats water supplied to the dispenser and, on applicable models, the ice maker. Over time, the filter becomes less effective and can also become restricted by particles collected from the incoming water supply.
A clogged filter may cause symptoms such as slower dispensing, reduced ice production, smaller ice cubes, or a noticeable change in the taste or smell of the water.
Air Filter
Some KitchenAid refrigerators also use a FreshFlow-style air filter inside the fresh-food compartment.
The air filter is different from the water filter. Its job is to help control food odors inside the refrigerator rather than filter drinking water.
Not every KitchenAid refrigerator includes an air filter, so do not assume you need to replace one unless your refrigerator is equipped with an air-filter housing.
Before Changing Your KitchenAid Refrigerator Filter
Taking a minute to identify the correct filter can save you from one of the most common replacement problems: buying a cartridge that looks similar but will not fit.
Find Your Refrigerator Model Number
Your KitchenAid refrigerator model number is usually printed on a label somewhere inside the appliance. Depending on the refrigerator, the label may be found on an interior wall, near the top of the fresh-food compartment, around the door frame, or close to one of the drawers.
Use that model number when checking replacement-filter compatibility.
This is especially important for refrigerators sold in the USA, Canada, the UK, and Australia because filter names, packaging, part numbers, and availability can differ between markets.
Check the Existing Filter
If possible, remove or inspect your current filter before ordering a replacement. Look for:
- The filter number or part number
- The shape of the cartridge
- The connection end
- Arrows showing installation direction
- Any reusable cap attached to the old filter
Do not choose a replacement simply because the cartridge appears to be the same size.
Which KitchenAid Refrigerator Water Filter Do You Need?
KitchenAid refrigerators use several water-filter designs. In the U.S. market, KitchenAid’s current replacement guidance covers Filter 1, Filter 2, Filter 3, and Filter 4 families, with KitchenAid-branded and compatible everydrop filter options available for supported models.
The refrigerator model number is the safest way to determine which one you need.
| Filter Type | Common Location | General Removal Style |
|---|---|---|
| KitchenAid Filter 1 | Upper-right refrigerator interior | Pull straight out |
| KitchenAid Filter 2 | Often upper-right interior | Angle down, turn left and remove |
| KitchenAid Filter 3 | Left side of base grille | Eject and pull out |
| KitchenAid Filter 4 | Upper-right roof/interior | Turn left and remove |
These locations and methods describe common KitchenAid configurations, not every refrigerator ever produced. If the filter in your refrigerator does not match the description, follow the instructions for your specific model instead.
Where Is the Water Filter on a KitchenAid Refrigerator?
One reason people struggle with KitchenAid refrigerator filter replacement is that there is no single filter location used across every model.
Common locations include:
- The upper-right corner inside the refrigerator compartment
- The upper interior or ceiling area
- Near a temperature-controlled or crisper drawer
- The lower section of the refrigerator
- Behind or inside the base grille
KitchenAid’s own guidance notes that refrigerator water filters may be located in areas such as the upper interior, around the drawers, or at the bottom grille depending on the design.
French Door KitchenAid Refrigerators
On many French-door models, the filter is inside the refrigerator compartment, commonly near an upper corner. Some models place it lower down near a temperature-controlled drawer.
Look for a narrow filter door or housing rather than the cartridge itself.
Side-by-Side KitchenAid Refrigerators
Some side-by-side refrigerators use a filter mounted near the bottom of the appliance or inside the base grille.
If you cannot find a filter compartment inside the fresh-food section, check the lower grille area.
Built-In KitchenAid Refrigerators
Built-in models can vary significantly. Some use interior filter housings, while others place the filter near the lower portion of the appliance.
For a built-in refrigerator, checking the model-specific owner’s manual is particularly useful because the installation can differ from freestanding models.
Bottom-Freezer KitchenAid Refrigerators
Bottom-freezer refrigerators frequently place the filter in the fresh-food compartment, although the exact position depends on the series.
If you see a small door marked for the filter, open it carefully before attempting to pull or twist the cartridge.
How to Change a KitchenAid Refrigerator Water Filter
Once you have the correct replacement cartridge, the actual filter change usually takes only a few minutes.
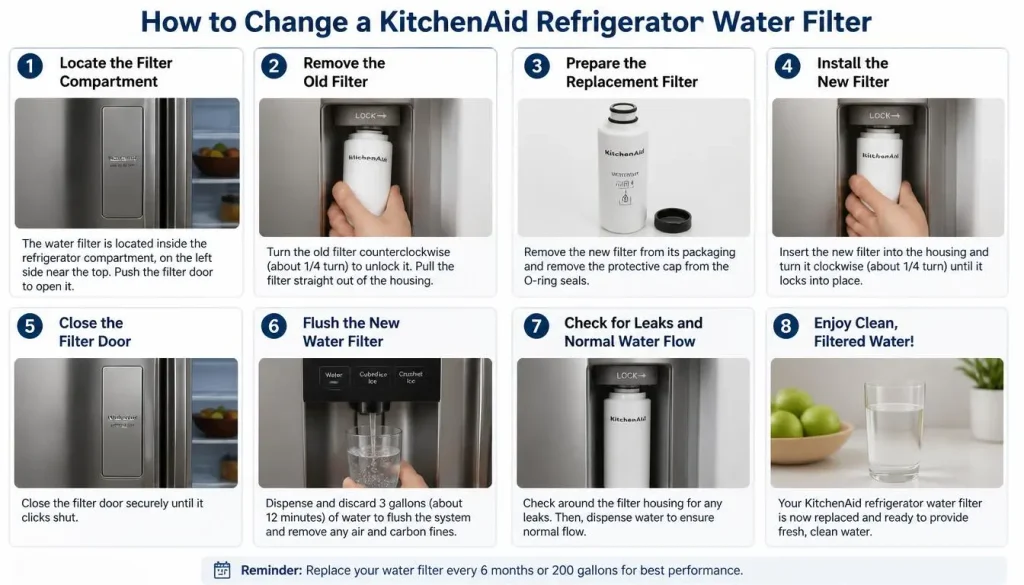
Step 1: Locate the Filter Compartment
Open the refrigerator completely and locate the water-filter housing.
Make sure drawers, shelves, or food containers are not blocking access. If the filter is behind a hinged door, open the compartment according to its design.
Place a towel underneath or near the filter before removing it. A small amount of water left inside the old cartridge can spill during removal.
Step 2: Remove the Old Filter
The correct removal method depends on the filter.
A pull-style filter may release when you open the filter door and pull the cartridge toward you.
A twist-style filter usually needs to be turned to the left before it can be removed.
A base-grille filter may use an eject button.
Do not force the cartridge. If it will not move, confirm that you are using the correct release method before applying additional pressure.
Step 3: Prepare the Replacement Filter
Remove the new filter from its packaging.
If there are protective covers over the connection points or O-rings, remove them carefully. Check that the O-rings remain properly seated after the protective covers are removed.
If your old cartridge uses a reusable cap, do not throw it away. Transfer it to the replacement filter if your model requires it.
Step 4: Install the New Filter
Align the replacement cartridge with the filter housing.
Some KitchenAid filters have an arrow that should point upward during installation. Others use grooves or tabs that must line up correctly before the filter will lock into place.
Push or rotate the filter according to your refrigerator’s design.
You should not need excessive force. If the cartridge refuses to go in, remove it and inspect the alignment before trying again.
Step 5: Close the Filter Door
After the cartridge is fully seated, close the housing or filter door until it locks.
Do not leave the filter partially installed. An improperly seated cartridge can cause low water flow or leaking.
Step 6: Flush the New Water Filter
Dispense water after installation to remove trapped air and flush the new filter.
KitchenAid’s current U.S. instructions for Filter 1 through Filter 4 specify running four U.S. gallons of water through the system after replacement, which is approximately 15 litres.
However, instructions can differ by model and region. If your refrigerator manual specifies a different flushing quantity, use the amount given for your appliance.
Step 7: Check for Leaks and Normal Water Flow
Inspect the filter housing while dispensing water.
A few initial spurts or changes in flow can occur as air leaves the system. Continue flushing as directed.
Afterward, check that:
- Water flows normally from the dispenser
- The filter housing stays dry
- The cartridge remains locked in position
- The ice maker is receiving water
- There is no unusual dripping around the filter
If you notice persistent leaking, stop and recheck the installation.
How Replacement Differs for KitchenAid Filter 1, 2, 3 and 4
Understanding the filter style can make replacement much easier.
How to Change KitchenAid Filter 1
KitchenAid’s current U.S. Filter 1 instructions place the filter housing in the upper-right area inside the refrigerator on supported models.
The basic process is:
- Lift the filter door.
- Pull the old filter straight out.
- Remove the protective covers from the new filter’s O-rings.
- Check that the O-rings stayed in position.
- Insert the replacement with the arrow facing upward.
- Close the filter door securely.
- Flush the water system.
If the replacement does not slide in smoothly, do not force it. Slightly rotate it until the cartridge tabs and housing grooves align correctly.
How to Change KitchenAid Filter 2
On many Filter 2 installations, the filter is also located near the upper-right corner of the refrigerator compartment.
To replace it:
- Open the filter door.
- Pull the cartridge downward slightly.
- Turn it to the left and pull it out.
- Remove the protective cap and O-ring covers from the replacement.
- Insert the new filter with its arrow oriented correctly.
- Allow the cartridge to rotate into position as it is pushed into the housing.
- Close the filter door.
- Flush the system.
Some Filter 2 refrigerators use a different location near the lower-left area beside a temperature-controlled drawer, so check your model if the upper-right instructions do not match what you see.
How to Change KitchenAid Filter 3
Filter 3 is commonly found on the left side of the refrigerator’s base grille on supported models.
Replacement generally involves pressing the eject mechanism, pulling out the old cartridge, transferring the reusable filter cap when required, inserting the new cartridge in the correct orientation, and pushing it in until the release mechanism returns to its normal position.
Keep any reusable cap from the old filter. It may be part of the refrigerator’s filter assembly rather than disposable packaging.
How to Change KitchenAid Filter 4
KitchenAid Filter 4 is commonly located in the upper-right roof area inside supported refrigerators.
Open the filter cover, turn the old cartridge to the left and remove it. Align the new cartridge with the housing grooves, push it into position, rotate it to the right, lock it in place, and close the filter door.
If you are installing a filter for the first time, there may be a temporary cap inside the housing that must be removed before the cartridge can be fitted.
How Much Water Should You Flush Through a New KitchenAid Filter?
Flushing is one of the easiest steps to forget, but it matters.
A new carbon-based refrigerator filter may contain harmless loose carbon particles, and replacing the cartridge can introduce air into the water line. Flushing helps clear the line and establish a steady water flow.
For KitchenAid’s current U.S. Filter 1, 2, 3, and 4 replacement instructions, the specified flush amount is four U.S. gallons, or roughly 15 litres.
For refrigerators sold outside the United States, consult the local manual because the recommended quantity may be expressed differently or may vary by model.
Instead of attempting to dispense the full amount in one uninterrupted cycle, you can use several containers until the recommended total has passed through the system.
How to Reset the KitchenAid Refrigerator Water Filter Light
Changing the physical filter and resetting the filter indicator are two separate tasks.
On many KitchenAid refrigerators, installing a new cartridge does not automatically clear the replacement reminder. Some newer models may behave differently, so always check your control panel after installation.
KitchenAid currently documents several reset methods.
Method 1: MAX COOL + MAX ICE
On applicable models, touch and hold MAX COOL and MAX ICE together for approximately three seconds.
The display may perform a countdown before confirming the reset.
Method 2: FILTER RESET Button
If your refrigerator has a dedicated FILTER RESET control, press and hold it until the filter-status warning clears.
Method 3: WATER FILTER Button
Press and hold the WATER FILTER button for approximately three seconds.
On compatible displays, the filter icon may return to its normal status and the “Replace Filter” message will disappear.
Method 4: OPTIONS Menu
Some models use a menu-based process.
Select OPTIONS, choose FILTER RESET, and then use MEASURED FILL or the confirmation control specified by the refrigerator to complete the reset.
Method 5: LIGHT + ICE TYPE
On certain dispenser-control layouts, press and hold LIGHT and ICE TYPE together for approximately three seconds.
These reset combinations are model-specific, so do not repeatedly press random control-panel buttons if none of the methods match your refrigerator. Check the owner’s manual for the correct sequence instead.
What Do KitchenAid Water Filter Status Lights Mean?
KitchenAid refrigerator displays vary, but the filter indicator generally tells you when the cartridge is approaching the end of its recommended service period.
Depending on the model, you may see a filter percentage, a colored indicator, “Order Filter,” “Replace Filter,” or a similar message.
On some KitchenAid models:
| Filter Status | What It Usually Means |
|---|---|
| Normal/Good | The filter is still within its expected service period |
| Yellow/Order | Purchase a replacement soon |
| Red/Replace | Replace the water filter |
| Replace Filter remains after installation | The status system may need to be reset |
Do not rely solely on the light if water flow has already become noticeably slow. A filter can require earlier replacement because of water quality or higher-than-normal usage.
KitchenAid Refrigerator Filter Problems After Replacement
Most filter changes go smoothly, but when something goes wrong, the cause is often simple.
KitchenAid Refrigerator Filter Is Stuck or Won’t Come Out
First, confirm the removal mechanism.
If it is a twist filter, make sure it has been rotated fully into the release position.
If it uses an eject button, press the button before pulling.
For an internal filter, open the filter door completely. Some cartridges need to angle downward before they can be turned and removed.
Avoid using pliers directly on the filter unless model-specific service instructions call for them. Excessive force can damage the housing.
New KitchenAid Filter Won’t Go In
A new filter that refuses to fit usually points to one of four problems:
- The replacement cartridge is not compatible
- The filter is facing the wrong direction
- The tabs are not aligned with the housing grooves
- A protective cap has not been removed
Compare the old and new cartridges side by side before continuing.
If they are visibly different at the connection point, stop and verify the part number.
New Water Filter Won’t Stay in Place
If the cartridge goes in but immediately releases, it may not be reaching the locking position.
Remove it, inspect the housing for obstructions, check the tabs or grooves, and reinstall it without forcing the connection.
A cartridge that is almost—but not fully—compatible may appear to fit while failing to lock correctly.
Water Is Leaking After Changing the Filter
A few drops from the old cartridge during removal are normal. Continuous leaking after the new filter is installed is not.
Check for:
- A cartridge that is not fully seated
- Damaged or displaced O-rings
- A reusable cap installed incorrectly
- The wrong replacement filter
- Damage to the filter housing
Remove the filter and reinstall it carefully.
If water continues leaking from the refrigerator even after confirming the cartridge is correct and properly installed, shut off the refrigerator’s water supply and investigate the housing or water connection.
No Water After Replacing the Filter
If the dispenser stops working immediately after a filter replacement, check the installation before assuming something has failed.
Remove and reinstall the filter, ensuring it is fully locked into the housing.
Then flush the dispenser to clear trapped air.
KitchenAid notes that clogged or improperly installed filters can reduce the water flow supplied to both the dispenser and ice maker.
Water Dispenser Is Slow After Filter Replacement
Slow flow may be caused by trapped air, an incorrectly seated filter, a restricted cartridge, low household water pressure, or a problem with the water-supply line.
If the dispenser worked normally before the replacement, start by removing and reinstalling the new filter.
Also verify that the replacement cartridge is compatible with your exact refrigerator model.
Water Looks Cloudy After Installing a New Filter
Cloudiness immediately after replacement is often caused by tiny air bubbles introduced during the filter change.
Flush the system thoroughly and allow the water to settle in a clear glass.
If the cloudiness disappears from the bottom upward after sitting briefly, trapped air is a likely explanation.
Persistent discoloration, unusual particles, or odor after the recommended flush deserves further investigation.
Water Tastes Strange After Filter Replacement
New-filter taste is often reduced by additional flushing.
Continue dispensing water until the recommended quantity has passed through the system.
If the taste remains unusual, confirm that the filter is the correct model, has not expired in storage, and is installed properly.
Ice Maker Is Slow After Replacing the Filter
Because the water filter can affect the water supply feeding the ice maker, a restricted or improperly installed cartridge may result in slower ice production or smaller cubes.
Check that the filter is fully seated and that dispenser flow is normal.
If the refrigerator has just been reconnected to the water supply, also allow sufficient time for normal ice production to resume.
Filter Light Is Still On After Replacement
The most likely explanation is that the filter-status system has not been reset.
Use the correct control-panel method for your model. If the normal reset sequence does not work, locate the model number and consult the owner’s manual rather than assuming the new filter is defective.
Can You Use a KitchenAid Refrigerator Without a Water Filter?
Some KitchenAid refrigerator water systems can operate in bypass mode when the filter is removed.
KitchenAid’s current Product Help guidance states that, on applicable systems, removing a clogged filter allows the water system to continue operating in bypass mode. The water is not being filtered while the cartridge is absent.
However, bypass operation varies by refrigerator design. Some models may use a bypass cap or plug, while others may bypass internally.
For that reason, do not assume every KitchenAid refrigerator can dispense normally with an empty filter housing. Check the instructions for your specific model.
If you are temporarily using bypass mode because a clogged filter has reduced water flow, install a compatible replacement as soon as practical if you want filtered drinking water.
How Often Should You Change a KitchenAid Refrigerator Water Filter?
KitchenAid generally recommends replacing refrigerator water filters about every six months, when the replacement indicator appears, or sooner when needed.
Six months is a useful guideline rather than a guarantee that every cartridge will perform identically for exactly that length of time.
You may need to change the filter sooner if:
- Your household uses a large amount of refrigerator water
- The water supply contains more sediment
- Water flow becomes noticeably slower
- Ice production drops
- The water develops an unusual taste or odor
- The filter warning appears earlier
If your refrigerator has no electronic filter indicator, consider keeping a reminder of the installation date.
How to Change a KitchenAid Refrigerator Air Filter
If your refrigerator has a FreshFlow air filter, its replacement process is separate from the water filter.
KitchenAid says the air-filter housing on compatible refrigerators can be located on the rear wall of the refrigerator compartment, often near the upper or middle section behind a vented cover.
To replace it:
- Locate the air-filter housing.
- Open or remove the housing cover according to its design.
- Remove the old filter.
- Unpack the compatible replacement air filter.
- Snap the new filter securely into position.
- Reinstall or close the housing cover.
- Reset the air-filter status if your model uses an electronic reminder.
On some KitchenAid models, the air-filter status can be reset by pressing and holding the AIR FILTER button for three seconds. KitchenAid also uses status stages such as Good, Order, Replace, and Expired on compatible displays.
Be careful not to remove unrelated foam components inside the air-filter cover. Certain models use a foam piece to help direct airflow.
Frequently Asked Questions About How to Change KitchenAid Refrigerator Filters
Do I Need to Turn Off the Water Before Changing a KitchenAid Refrigerator Filter?
For many common internal cartridge replacements, the filter housing is designed so that you can replace the cartridge without shutting off the household water supply.
However, refrigerator designs vary. Follow the owner’s manual for your model.
If you are working on a damaged housing, water line, or connection rather than simply changing the cartridge, shutting off the refrigerator water supply is the safer approach.
Do I Need to Unplug the Refrigerator to Change the Water Filter?
A routine cartridge replacement generally does not involve electrical components, and many filter changes are performed with the refrigerator operating.
If your model’s instructions require moving panels, accessing electrical areas, or performing service beyond a normal filter change, disconnect power before doing that work.
How Do I Know Which KitchenAid Water Filter I Need?
Find the refrigerator model number and use it to identify compatible filters.
You can also inspect the existing cartridge for its filter or part number.
Do not order based only on the shape or color of a product image because several refrigerator filters can look very similar.
How Much Water Should I Run After Changing a KitchenAid Filter?
KitchenAid’s current U.S. instructions for Filter 1 through Filter 4 call for four U.S. gallons, approximately 15 litres, to be run through the water line after replacement.
Use your refrigerator’s model-specific instructions if they give a different quantity.
Why Is My KitchenAid Refrigerator Filter Light Still On?
The refrigerator may require a manual filter-status reset.
Common KitchenAid reset methods include holding FILTER RESET, holding WATER FILTER, using MAX COOL plus MAX ICE, using LIGHT plus ICE TYPE, or selecting FILTER RESET through the OPTIONS menu.
The correct method depends on your refrigerator.
Can I Use a Generic Filter in a KitchenAid Refrigerator?
Physical fit is not the only consideration when choosing a refrigerator water filter.
Check model compatibility and relevant filtration certifications before using a replacement cartridge. KitchenAid recommends filters made or approved for compatible KitchenAid refrigerators.
Can a Dirty Water Filter Stop the Ice Maker?
A severely restricted filter can reduce water flow to the ice maker.
KitchenAid notes that a clogged or incorrectly installed water filter may contribute to smaller ice cubes, lower ice production, and slower dispensing.
However, an ice maker that stops completely can also have unrelated causes, including water-supply, temperature, valve, or ice-maker problems.
Why Is My New KitchenAid Filter Making Noise?
Temporary sputtering or unusual dispenser sounds after replacement are often associated with air moving through the water system.
Flush the new cartridge fully.
If the noise continues after flushing, inspect the filter installation and make sure the cartridge is properly locked into the housing.
How Long Does It Take to Change a KitchenAid Refrigerator Filter?
Once you have the correct replacement filter, the physical cartridge change usually takes only a few minutes.
Flushing the new filter generally takes longer than removing and installing it, so allow extra time to run the recommended amount of water through the system.
What Happens If I Don’t Change My KitchenAid Water Filter?
As the cartridge becomes clogged, water flow can decrease and dispenser performance may suffer.
You may also notice changes in taste or odor.
Continuing to use a severely restricted cartridge can affect the amount of water reaching the dispenser or ice maker, so replace it when required rather than waiting for flow to stop completely.
Final KitchenAid Filter Replacement Checklist
Before considering the job finished, confirm that you have:
- Identified the correct KitchenAid refrigerator model.
- Purchased a compatible water filter.
- Removed the old cartridge using the proper method.
- Checked the replacement filter’s O-rings and protective caps.
- Installed and locked the new filter correctly.
- Closed the filter housing completely.
- Flushed the recommended amount of water through the system.
- Checked the housing for leaks.
- Confirmed normal dispenser flow.
- Reset the water-filter indicator if required.
Final Thoughts
Learning how to change KitchenAid refrigerator filters is much easier once you know which filter system your refrigerator uses.
The most important step is not pulling, twisting, or forcing the old cartridge—it is identifying the correct replacement filter and following the installation method designed for your refrigerator.
After installing the new filter, do not skip the flush or filter-light reset. Those two steps solve many of the problems people experience immediately after a replacement.
And if the filter will not come out, the new cartridge will not fit, the dispenser stops working, or the filter light refuses to reset, avoid forcing anything. Recheck the filter type and refrigerator model first. In many cases, the problem is a compatibility, alignment, or reset issue rather than a faulty refrigerator.

Hi, I’m the lead researcher and appliance enthusiast behind RefrigeratorSolve. With years of hands-on experience troubleshooting cooling systems and testing home appliances, I am dedicated to bringing you honest reviews, energy-saving tips, and practical solutions to keep your refrigerator running perfectly.