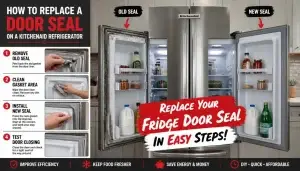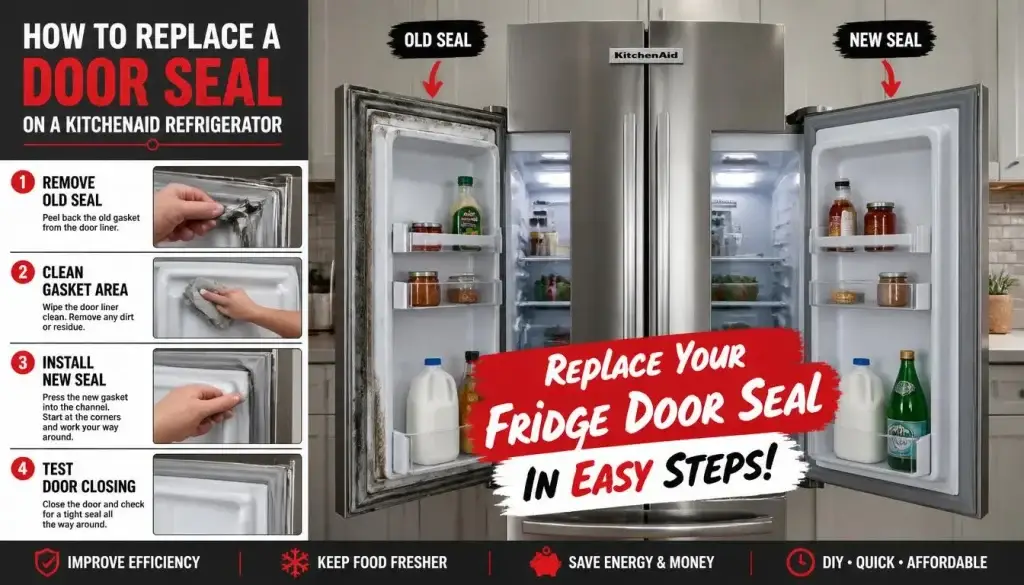
Unplug the KitchenAid refrigerator, confirm the full model number, remove the old gasket from its press-fit channel or retaining strip, clean the mounting area, and install the matched replacement. Warm shipping folds, seat every corner, then confirm a tight seal and 37°F (3°C) refrigerator temperature.
Which Gasket System Does Your KitchenAid Have?
Identify this in 60 seconds before reading further.
Step 1: Open the refrigerator door and find the inner gasket edge at the top corner.
Step 2: Gently lift the rubber inner lip with one finger.
- You feel a plastic dart or rib pressed into a molded groove → Press-fit system. Common on KitchenAid French-door and bottom-freezer models from the 2010s onward. Skip to “Install a Modern Press-Fit Gasket.”
- You see small hex screws or a metal retaining strip → Retaining-strip system. Common on older KitchenAid built-in and Superba-style models. Skip to “Install an Older Retaining-Strip Gasket.”
- French-door model? Also check the left-door mullion (center flipper). If it folds outward instead of inward, this, not the perimeter gasket may be causing your air leak.
- Unsure? Search your full model number on partselect.com, the part listing shows the mounting type for your exact unit.
A torn or twisted refrigerator gasket can look like a major cooling failure. You may find condensation along the door, frost near the freezer opening, warm food in door bins, or a compressor that runs longer than usual. On French-door models, one corner can leak even when the door appears closed.
Learning how to replace door seal on KitchenAid refrigerator models is usually manageable without removing the door. The important step is identifying the gasket system first. Many modern KitchenAid French-door and bottom-freezer refrigerators use a press-fit gasket seated in a molded channel. Some older built-in and Superba-style units use screws and a metal retaining strip.
KitchenAid also uses model-specific seals. Two gaskets may look alike but have different profiles, corners, magnets, or orientation tabs. The complete model number and revision suffix are essential when ordering an OEM part.
This guide covers diagnosis, model-number location, mounting-system identification, gasket preparation, installation, French-door alignment, and temperature testing.
Why a Leaking KitchenAid Refrigerator Door Seal Matters
A damaged gasket lets humid room air enter the cabinet. Moisture can collect on shelves, form frost around vents, soften frozen food, and shorten fresh-food storage time. The refrigerator may also run more often because heat keeps entering through the gap.
The warning can be subtle. Milk may feel warmer near the door. Moisture may appear around the center of a French-door unit. The compressor may continue running after the kitchen becomes quiet.
Before replacing the seal, rule out closure problems. A door bin can strike a shelf. Heavy containers can pull the door downward. Food packaging can cross the cabinet frame. Better kitchen organization often fixes a door that cannot close fully.
KitchenAid French-door models have a brand-specific detail: the left fresh-food door may include a vertical hinged mullion, or flipper. It folds inward when the door opens and seals the center when both doors close. If it stays folded outward, the doors may not seal even when the perimeter gasket is good.
Did You Know: A refrigerator gasket limits warm, moist air infiltration so the cooling system can maintain safe food-storage temperatures without unnecessary run time.
Smart refrigerators may warn about rising temperature or an open door, but AI-powered cooling cannot repair a physical air leak.
Best Ways to Replace a KitchenAid Refrigerator Gasket
Confirm the Exact Model and Gasket Part
Best for: Anyone ordering a replacement seal.
How to do it:
- Find the model label inside the fresh-food compartment. Built-in KitchenAid units commonly use the left interior wall, while many side-by-side models use the right wall. Some quad-door units may use the left wall or rear panel.
- Record the complete model and suffix, such as
KRFC300ESS07. - Match it to the exact OEM gasket. KitchenAid-compatible formats include
W10830162,W10443320,W10407216,WPW..., and older numbers such as2159083.
Expected result: The gasket matches the door size, channel, magnet position, and orientation.
What a KitchenAid replacement gasket costs and where to buy:
KitchenAid is a premium Whirlpool-family brand. OEM gaskets are priced accordingly:
- PartSelect.com — Best US source for KitchenAid OEM gaskets with model-number lookup
- AppliancePartsPros.com — Large inventory, fast US and Canada shipping
- RepairClinic.com — Good for older KitchenAid built-in and Superba models
- Amazon — Third-party compatible options; verify the dart profile matches OEM before ordering
- ReliablePartsCanada.ca — Best option for Canadian KitchenAid owners
- eSpares.co.uk / KitchenAid UK — For UK-based owners (kitchenaid.co.uk → Support → Spare Parts)
Expected cost: OEM KitchenAid replacement gaskets typically cost $45–$110 USD ($60–$145 CAD / £40–£85 GBP) depending on the model, door position, and whether it is a standard or French-door unit. Third-party gaskets cost less but may not match the OEM dart profile for press-fit systems, OEM fit is strongly recommended to avoid corner gaps.
Identify the KitchenAid Mounting System
Best for: Owners unsure whether the gasket pulls out or uses screws.
How to do it:
- Lift the inner gasket edge at one top corner.
- Look for a narrow dart pressed into a molded groove, common on many freestanding KitchenAid platforms from the 2010s through the 2020s.
- If screw heads clamp the gasket beneath a metal strip, use the older retaining-strip method found on some late-1990s and early-2000s built-ins. KitchenAid platforms overlap, so verify this with your model manual.
Expected result: You avoid tearing the liner or removing hardware unnecessarily.
Relax Shipping Folds
Best for: Gaskets that arrive twisted or compressed.
How to do it:
- Lay the seal flat in a warm room for 30 minutes.
- Warm stubborn folds with a Conair 1875-Watt hair dryer on low, moving it 6 to 8 inches from the vinyl.
- Stop when the material becomes flexible. Do not heat it until glossy.
Expected result: The gasket regains its shape and fits without raised corners.
Install a Modern Press-Fit Gasket
Best for: KitchenAid doors with a push-in dart channel.
How to do it:
- Pull the old gasket straight from one corner without prying against the liner.
- Wash the channel with mild dish soap and dry it.
- Seat all four corners first, then press each side from the corners toward the center.
Expected result: The seal sits evenly with no loose darts or stretched sections.
Install an Older Retaining-Strip Gasket
Best for: Older KitchenAid built-ins with hidden screws.
How to do it:
- Use a Klein Tools 32500 screwdriver or the specified nut driver to loosen each screw two or three turns.
- Remove the old gasket lip and slide the new lip beneath the metal retainer.
- Square the seal, tighten the top and bottom centers first, then alternate sides without crushing the vinyl.
Expected result: The gasket remains centered and securely clamped.
Test Door Contact and Temperature
Best for: Confirming the repair before restocking sensitive food.
How to do it:
- Close a sheet of paper at the top, bottom, hinge side, and handle side. It should resist a gentle pull.
- Check that the French-door mullion folds correctly and shelves do not obstruct closure.
- Place a Rubbermaid Commercial FGTHR4 refrigerator/freezer thermometer in the center and verify about 37°F (3°C) in the refrigerator and 0°F (-18°C) in the freezer after 24 hours.
Expected result: The door seals evenly and normal food-storage temperatures return.
Step-by-Step Guide
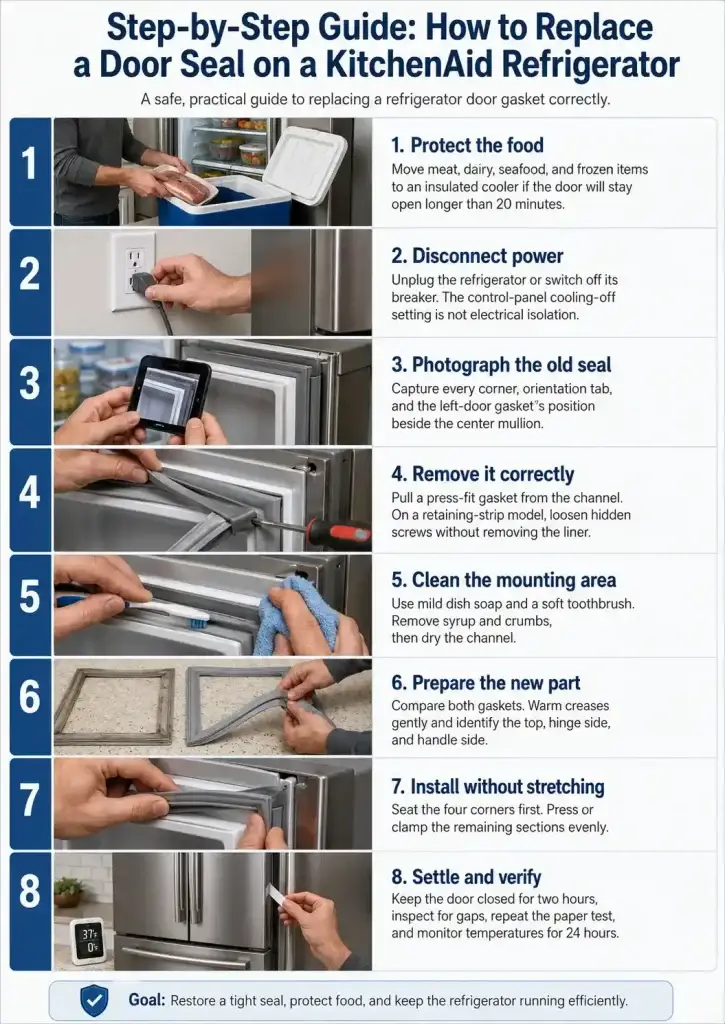
- Protect the food. Move meat, dairy, seafood, and frozen items to an insulated cooler if the door will stay open longer than 20 minutes.
- Disconnect power. Unplug the refrigerator or switch off its breaker. The control-panel cooling-off setting is not electrical isolation.
- Photograph the old seal. Capture every corner, orientation tab, and the left-door gasket’s position beside the center mullion.
- Remove it correctly. Pull a press-fit gasket from the channel. On a retaining-strip model, loosen hidden screws without removing the liner.
- Clean the mounting area. Use mild dish soap and a soft toothbrush. Remove syrup and crumbs, then dry the channel.
- Prepare the new part. Compare both gaskets. Warm creases gently and identify the top, hinge side, and handle side.
- Install without stretching. Seat the four corners first. Press or clamp the remaining sections evenly.
- Settle and verify. Keep the door closed for two hours, inspect for gaps, repeat the paper test, and monitor temperatures for 24 hours.
Should You Replace the KitchenAid Gasket Yourself or Call a Technician?
Replace it yourself if:
- The refrigerator is outside its warranty period (KitchenAid standard warranty: 1 year full, plus limited coverage on certain parts in the US and Canada)
- The damage is limited to the gasket no cracked door liner, no hinge damage, no cooling-system symptoms
- You can locate the model number and confirm the correct OEM part number before ordering
Call KitchenAid or a technician if:
- The refrigerator is within its warranty — DIY replacement may void coverage on a premium appliance
- The inner door liner is cracked, the mounting channel is broken, or the hinge is visibly bent
- Fresh-food temperatures stay above 40°F (4°C) after 24 hours with a new gasket installed, this suggests a fan, sensor, or sealed-system problem beyond the gasket
- You own a KitchenAid built-in column refrigerator — these have more complex door and hinge systems that benefit from professional service
KitchenAid support contacts:
US & Canada: 1-800-422-1230 | UK: 0800 862 0453 | Australia: 1300 363 640 (KitchenAid AU service is managed through Whirlpool Australia)
Expert Tips and Common Mistakes
- Check the complete suffix.
KRFC300ESS00andKRFC300ESS07may use revised parts. - Mark the gasket top before removal. Some KitchenAid seals have molded tabs or directional profiles.
- Seat corners before straight sections. This prevents stretching and improves magnetic contact.
- Correct door sag. Applicable French-door models may use a bottom-hinge adjustment, often operated with a 1/8-inch hex key.
- Maintain the seal monthly. Clean it with warm water and inspect yearly for splits, hardened areas, and loose corners.
Common Mistakes to Avoid
- Ordering by appearance. The wrong channel profile can create a hidden gap, condensation, and long compressor cycles.
- Overheating the vinyl. A close heat gun can shrink or blister the gasket, leaving a permanent corner leak.
- Stretching one side. Pulling the long section tight often lifts the opposite corner after closing.
- Ignoring the KitchenAid mullion. A folded-out or misaligned center flipper can imitate perimeter-gasket failure.
After installation, keep warm leftovers away from the door and leave airflow around vents. Store heavy containers on shelves instead of overloading door bins. These food storage tips improve temperature stability, refrigerator maintenance, kitchen organization, and the performance expected from energy-efficient appliances.
FAQs on How to Replace a Door Seal on a KitchenAid Refrigerator
How do I know if my KitchenAid refrigerator door seal needs replacing?
Look for tears, hardened vinyl, loose corners, trapped mold, or areas that no longer touch the cabinet. Perform a paper test at several points. If the paper slides out with almost no resistance after cleaning the gasket and aligning the door, replacement is usually appropriate. Also investigate recurring condensation or frost near one section of the opening.
Where is the model number on a KitchenAid refrigerator?
Built-in KitchenAid refrigerators commonly place the label on the left interior wall. Many side-by-side units use the right interior wall. French-door units generally place it inside the fresh-food compartment, while some quad-door models may use the left wall or rear panel. Record the complete suffix and verify the location with your model manual.
Are all KitchenAid refrigerator door seals press-fit?
No. Many freestanding French-door and bottom-freezer KitchenAid models from the 2010s and 2020s use a press-fit dart in a molded channel. Older built-in platforms may use screws and a metal retaining strip. Undercounter units can differ. Lift the inner gasket edge and verify this with your model manual before removing anything.
Can I replace the gasket without removing the refrigerator door?
Usually, yes. Most press-fit and retaining-strip gasket repairs can be completed with the door mounted. Do not remove hinges unless the model procedure requires it. Never rely on the gasket magnets to support a door during hinge work. Refrigerator doors are heavy and may contain wiring or water tubing.
How long should a new KitchenAid gasket take to seal?
A correctly installed gasket should contact the cabinet immediately, but shipping folds may need several hours to relax. Keep the door closed for about two hours, then repeat the paper test. Monitor the appliance for 24 hours. The refrigerator should settle near 37°F (3°C), and the freezer should remain near 0°F (-18°C).
Why does my KitchenAid French-door refrigerator still leak air?
Check the left-door mullion, door height, overloaded bins, and shelves projecting too far forward. The mullion must fold inward as the left door opens and engage when both doors close. Inspect every corner for an unseated gasket dart. A new seal cannot compensate for a sagging, obstructed, or misaligned door.
How much does it cost to replace a KitchenAid refrigerator door seal?
An OEM KitchenAid replacement gasket typically costs between $45 and $110 USD depending on your model and door position. French-door models that require separate left and right gaskets may cost more.
Because KitchenAid is a premium brand, professional appliance technicians in the US typically charge $150 to $250 including labor for this service making DIY replacement especially cost-effective for out-of-warranty units, provided you can source the correct OEM part.
Conclusion
Replacing a KitchenAid refrigerator gasket can stop condensation, reduce frost, protect food, and help the cooling system maintain stable temperatures. Success depends on matching the complete model number, identifying the press-fit or retaining-strip system, preparing the gasket carefully, and seating every corner evenly.
Knowing how to replace door seal on KitchenAid refrigerator models also helps you spot brand-specific issues, especially the left-door mullion used on many French-door designs. Do not assume every KitchenAid uses the same gasket or attachment method. Verify uncertain details with your model manual.
Today, test the seal with a sheet of paper at all four sides and record the complete model number before ordering a part.
For more refrigerator tips and appliance guides, explore more at refrigeratorSolve.

Hi, I’m the lead researcher and appliance enthusiast behind RefrigeratorSolve. With years of hands-on experience troubleshooting cooling systems and testing home appliances, I am dedicated to bringing you honest reviews, energy-saving tips, and practical solutions to keep your refrigerator running perfectly.