To check if a mini fridge door seal is faulty, start by doing a visual inspection for any cracks or gaps, and then perform the dollar bill test by closing the door on a bill and seeing if it pulls out easily. If it slides out without resistance, your seal might need attention to prevent cold air from escaping and raising your energy costs.
I remember the first time I noticed my mini fridge wasn’t keeping things as cold as it used to. I’d open it and feel a slight warmth, or see a bit of condensation around the edges nothing major, but enough to make me wonder what was going on. After a little digging and some trial and error, I realized the culprit was often the door seal, that rubbery strip that keeps the cold in and the warm air out. It’s a small part, but when it’s faulty, it can lead to bigger issues like higher electricity bills or spoiled food.
In this article, I’ll walk you through how to check if your mini fridge door seal is faulty, based on my own experiences and some easy tips I’ve picked up over the years. Whether you’re a student, in a small apartment, or just using a mini fridge for extra storage, this guide is for you. Let’s get started!
Why Door Seals Matter More Than You Think
Before we jump into the checking process, let’s talk about why this is so important. The door seal, also called a gasket, is what makes your mini fridge airtight. It’s that flexible strip around the door that compresses when you close it, creating a tight seal. If it’s damaged or worn out, cold air can leak out, forcing the fridge to work harder to maintain the temperature.
This not only wastes energy but can also cause your food to spoil faster. I’ve seen this happen in my own home a faulty seal led to a slight increase in my energy bill, and I had to throw out some items that didn’t stay fresh. By keeping an eye on the seal, you’re not just maintaining your appliance; you’re saving money and reducing waste. Plus, a good seal helps prevent mold and mildew buildup, which can affect air quality and cause unpleasant odors. Think of it as a simple way to care for your fridge and your home.
Signs Your Mini Fridge Door Seal Might Be Faulty

Over time, I’ve learned to spot the early warning signs that something’s off with the door seal. Here are some common indicators that might mean it’s time for a check:
- Condensation or Moisture: If you see water droplets or dampness around the door edges, it could mean warm air is getting in and reacting with the cold interior.
- Warm Spots: Feel the area around the door when the fridge is running. If it seems warmer than usual, cold air might be escaping.
- Frost or Ice Buildup: Excessive frost inside, especially near the door, can signal a seal problem because humidity is entering and freezing.
- Higher Energy Bills: A sudden spike in your electricity costs might be due to the fridge running longer to compensate for air leaks.
- Difficulty Closing the Door: If the door doesn’t shut smoothly or feels loose, the seal might be hardened or misaligned.
- Visible Damage: Look for cracks, tears, or gaps in the rubber this is often the most obvious sign.
I once ignored these signs in my old mini fridge, and it ended up costing me more in repairs later. Catching issues early can save you a lot of hassle.
Step-by-Step Guide: How to Check for a Faulty Door Seal
Now, let’s get into the practical steps. This is where you can easily test your mini fridge door seal yourself. I’ve done this multiple times, and it’s straightforward no special tools needed.
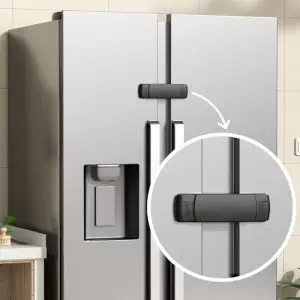
- Visual Inspection: Start by unplugging the fridge for safety. Open the door and closely examine the seal. Run your fingers along it to feel for any brittleness, cracks, or gaps. Look for areas where the rubber might be peeling away from the door. In my experience, even small imperfections can lead to big problems over time.

The Dollar Bill Test: This is a classic method I rely on. Take a dollar bill (or any paper note) and close the door on it, so it’s sandwiched between the seal and the frame. Try to pull it out. If it slides out easily, the seal isn’t tight enough. Repeat this at different points around the door to check for consistency. A good seal should hold the bill firmly in place.

- Paper Test Variation: For a broader check, use a strip of paper instead. Slide it around the door edges while closed. If you can pull it out without resistance in certain spots, that’s a red flag for gaps.

- Light Test: In a dark room, shine a flashlight inside the fridge and close the door. Look from the outside for any light escaping around the edges. If you see beams of light, it means air can get in, and the seal integrity is compromised.

- Listen for Hissing Sounds: With the fridge running, place your ear near the door seal. If you hear a faint hissing noise, it might indicate air leaking out.

After doing these tests, you’ll have a clear idea if your seal is faulty. I found that combining a couple of these methods gives the most reliable results. For instance, the dollar bill test caught a small gap I missed during my visual check.
What Causes Door Seals to Go Bad?
Understanding why seals fail can help you prevent issues. From my observations, common causes include:
- Normal Wear and Tear: Over years of use, the rubber can become less flexible and develop cracks.
- Dirt and Grime: buildup from food spills or dust can make the seal sticky or hard, preventing a tight close.
- Heat Exposure: Placing the fridge near heat sources, like an oven, can accelerate deterioration.
- Poor Alignment: If the door hinges are loose, the seal might not sit properly, leading to gaps.
- Mold and Mildew: Moist environments can cause growth that damages the rubber.
I once had a mini fridge in a humid garage, and the seal developed mold quickly. Regular cleaning helped extend its life.
How to Clean and Maintain Your Door Seal

A little maintenance goes a long way. Here’s what I do to keep my mini fridge door seal in good shape:
- Clean Regularly: Use a mild soap and water solution to wipe down the seal every month. Avoid harsh chemicals that could degrade the rubber.
- Dry Thoroughly: After cleaning, make sure the area is completely dry to prevent mold.
- Check Alignment: Ensure the door closes evenly and adjust the hinges if needed.
- Lubricate Sparingly: If the seal feels stiff, a small amount of silicone spray can restore flexibility, but use it sparingly to avoid residue.
This routine has kept my current mini fridge running smoothly for years without major issues.
When to Repair vs. Replace
If you find a faulty seal, you might wonder if you can fix it or need a new one. Based on my experience, minor issues like small gaps or stickiness can often be repaired with simple methods. For example, you can use a hairdryer on a low setting to warm and reshape slightly deformed rubber.
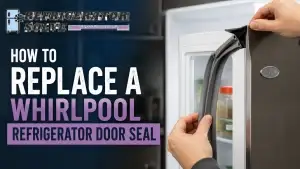
However, if there are large cracks, hardening, or the seal is torn, replacement is usually the best option. Replacement parts are affordable and easy to find online or at appliance stores. I’ve replaced a seal myself it involved removing the old one and snapping the new into place, which took about 30 minutes. If you’re unsure, consulting a professional can ensure it’s done right, especially if the fridge is under warranty.
DIY Fixes for Minor Seal Problems
For those who love a good DIY project, here are some quick fixes I’ve tried:
- Adjusting the Door: If the door isn’t closing tightly, tighten the hinges or check the latch.
- Using Sealant: For tiny cracks, a food-safe silicone sealant can provide a temporary patch.
- Heating the Seal: Gently warming the rubber with a hairdryer can make it more pliable and help it reseal.
Remember, these are short-term solutions; if problems persist, consider replacement for long-term efficiency.
The Impact on Energy Efficiency and Your Wallet
A faulty door seal doesn’t just affect your fridge it hits your pocketbook too. I noticed this firsthand when my energy bill crept up by about 10% over a few months. According to energy experts, a poor seal can cause a fridge to use up to 25% more electricity. That’s because the compressor has to run longer to maintain the set temperature. By fixing a faulty seal, you’re improving energy efficiency and saving money. It’s a simple step that contributes to a more sustainable home.
Quotes to Inspire Your Home Maintenance
“A small leak can sink a great ship.” – Benjamin Franklin. This reminds me that tiny issues, like a faulty door seal, can lead to bigger problems if ignored.
“Prevention is better than cure.” – Desiderius Erasmus. Regular checks on appliances like mini fridges can prevent costly repairs down the line.
“The bitterness of poor quality remains long after the sweetness of low price is forgotten.” – Henry Ford. Investing in a good seal or timely repair pays off in the long run.
Frequently Asked Questions (FAQs) for How to Check if a Mini Fridge Door Seal is Faulty
How often should I check my mini fridge door seal?
I recommend checking it every 3-6 months, or whenever you clean the fridge. This helps catch issues early.
Can I use any cleaner on the door seal?
Stick to mild soap and water. Harsh cleaners might damage the rubber over time.
What if the dollar bill test shows a problem, but the seal looks fine?
It could be an alignment issue with the door or hinges. Check those before assuming the seal is bad.
Is it expensive to replace a mini fridge door seal?
Not usually—replacement seals typically cost between $10 and $30, and it’s a simple DIY job.
Will a faulty seal make my fridge noisy?
Yes, if air is leaking, the compressor might run more often, leading to increased noise levels.
Can a bad seal cause health issues?
Indirectly, yes. If mold grows on the seal, it could affect air quality, so regular cleaning is important.
Conclusion
Checking if your mini fridge door seal is faulty is one of those simple tasks that can make a big difference in your daily life. From my own journey, I’ve learned that a few minutes of inspection can save you from higher bills, food waste, and unnecessary stress. By following the steps I’ve shared like the visual check and dollar bill test you can easily identify problems and take action. Remember, maintaining your appliances isn’t about being perfect; it’s about being proactive.
If you found this guide helpful, share it with a friend or leave a comment about your experiences. Together, we can keep our homes running smoothly and efficiently. Thanks for reading, and happy fixing!

Hi, I’m the lead researcher and appliance enthusiast behind RefrigeratorSolve. With years of hands-on experience troubleshooting cooling systems and testing home appliances, I am dedicated to bringing you honest reviews, energy-saving tips, and practical solutions to keep your refrigerator running perfectly.