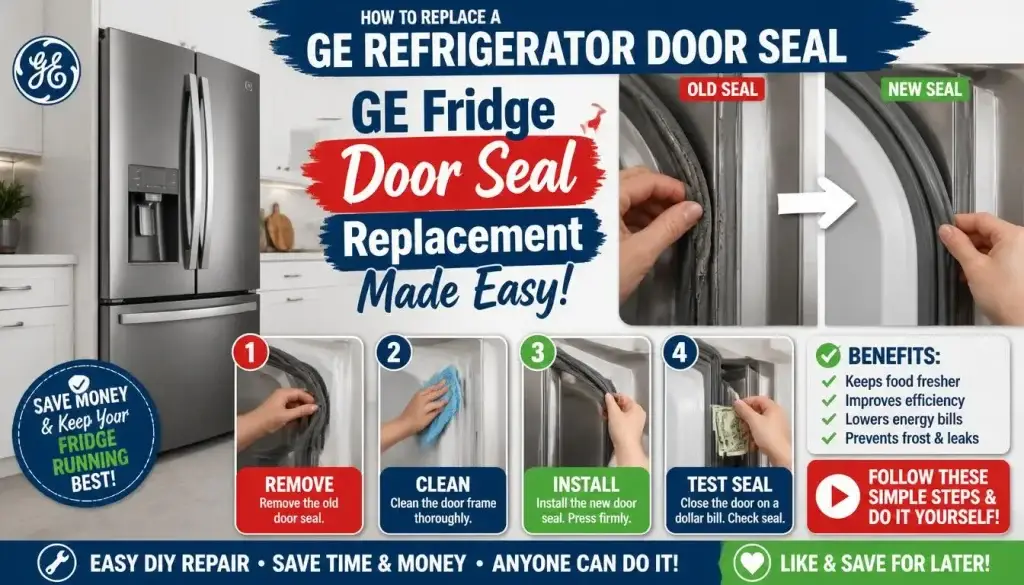
To replace a GE refrigerator door seal, match the gasket to the full model number, remove the old press-fit or screw-retained seal, clean the mounting area, and install the new gasket evenly from the corners. Warm shipping creases, then test the seal around the entire door.
Which Gasket Mounting System Does Your GE Have?
Identify this before reading further, it determines your entire removal method.
Step 1: Open the refrigerator door and find the inner gasket edge at any top corner.
Step 2: Gently lift the rubber inner lip about 2 inches with one finger.
- You feel a plastic barbed dart pressed into a smooth groove → Press-fit system. Common on GE French-door and bottom-freezer models from the 2010s onward, including most GE Profile and Café refrigerators. Skip to “Install a Press-Fit GE Gasket.”
- You see small hex screws or a plastic retaining strip → Screw-retained system. Common on older GE top-freezer and some side-by-side models. Skip to “Install a Screw-Retained GE Gasket.”
- GE French-door model? Also check the center mullion (flipper). It must rotate inward when the left door opens and lock into position when both doors close. If it misses its guide, fix this before replacing the gasket.
- Can’t tell? Search your full model number on geappliances.com/parts — the part listing confirms the mounting type for your exact unit.
A refrigerator door that no longer closes tightly can cause warm shelves, wet produce drawers, freezer frost, and longer compressor run times. Learning how to replace GE refrigerator door seal correctly can restore the airtight barrier before food temperatures become unstable.
The job is usually manageable with basic tools, but GE has used more than one gasket system. Many French-door and bottom-freezer models from the 2010s through 2026 use a magnetic gasket with a barbed edge that presses into a groove. Some older top-freezer and side-by-side platforms use screws or a retaining strip beneath the gasket lip. GE has no universal year cutoff, so inspect the door and verify this with your model manual before loosening anything.
The model number matters more than door measurements. On GE refrigerators, the tag is usually inside the fresh-food compartment near an upper side wall, crisper area, ceiling, temperature controls, or behind the crisper drawers. Bottom-freezer tags may also appear on a freezer side wall. GE model numbers normally begin and end with a letter, and newer tags may include a QR code.
This guide covers part identification, both GE mounting systems, gasket shaping, door alignment, temperature protection, and final seal testing.
Why a Worn GE Refrigerator Door Seal Matters
About the GE Appliances brand: GE Appliances is one of the most widely owned refrigerator brands in the US and Canada. Since 2016, GE Appliances has operated under Haier ownership, though parts and service remain fully supported through the GE Appliances network.
GE sells refrigerators under four main lines: standard GE, GE Profile (mid-premium), GE Café (premium), and GE Monogram (luxury built-in). This guide covers gasket replacement across all four lines. Part numbers and gasket profiles differ by model, always confirm against your exact model number, not your product line alone.
A weak gasket lets room air enter whenever the magnetic seal loses cabinet contact. Moisture may collect around the opening or freeze inside the compartment. Common signs include condensation, frost near the door, a door-open warning, soft ice cream, or milk warming faster than expected.
The compressor may run longer because it must remove incoming heat. That adds noise and works against the energy-saving features in modern energy-efficient appliances. On connected GE models, SmartHQ notifications can help reveal recurring temperature or door concerns, but the damaged gasket still needs physical repair.
Before replacement, close the door on printer paper at the top, bottom, corners, and handle side. The paper should resist when pulled. A loose section may come from dirt, a warped gasket, an overloaded door bin, a protruding drawer, hinge sag, or failed magnetic material.
GE French-door models require another check. The center mullion, or flipper, must rotate into position when the left door closes. If it misses the guide, the center can leak even when the outer gasket is healthy. Correct that alignment before ordering a seal.
Did You Know: A refrigerator holds safe temperatures more consistently when the door closes fully, the gasket stays clean, and food containers do not block cold-air vents.
Poor kitchen organization can imitate seal failure. A tall bottle or crowded shelf may hold the door open by only a few millimeters. Also inspect the cabinet face for residue that prevents magnetic contact. Fix those obstructions first.
Best Ways to Replace a GE Refrigerator Door Gasket
Confirm the Seal Is Damaged
Best for: Refrigerators showing moisture, frost, or a door that appears slightly open.
How to do it:
- Clean the gasket and cabinet contact surface with warm water and Dawn dish soap.
- Perform the paper test every 6 inches around the door.
- Check for splits, hardened vinyl, loose magnets, flattened corners, or recurring gaps.
Expected result: You confirm whether the gasket needs replacement or only cleaning and adjustment.
Find the Exact GE Gasket
Best for: Avoiding an incorrect seal profile, size, color, or door position.
How to do it:
- Check the fresh-food walls, ceiling, control area, crisper zone, and freezer wall for the model tag.
- Record the complete model number, including its final letters.
- Match the exact door and part number; common GE gasket prefixes include WR24X and WR14X.
Expected result: You receive a gasket made for the correct GE mounting channel.
What a GE replacement gasket costs and where to find it:
- GE Appliances Parts (geappliances.com/parts) — Official OEM source; search by model number for guaranteed fit
- AppliancePartsPros.com — Largest US third-party GE inventory with same-day shipping on many parts
- PartSelect.com — Strong model-number search tool, good for GE Profile and Café parts
- RepairClinic.com — Reliable for older GE top-freezer and side-by-side models
- Amazon — Third-party compatible options; verify WR24X or WR14X prefix matches OEM before ordering
- ReliablePartsCanada.ca — Best option for Canadian GE owners
- eSpares.co.uk — For UK-based GE owners (GE appliances are less common in the UK; Hotpoint is the nearest equivalent brand)
Expected cost:
- Standard GE gaskets: $30–$60 USD
- GE Profile gaskets: $45–$85 USD
- GE Café / Monogram gaskets: $60–$110 USD
OEM parts from geappliances.com cost slightly more but guarantee correct dart profile and magnet placement. For press-fit systems, OEM fit is strongly recommended.
Note for Australian readers: GE refrigerators are not commonly sold in Australia under the GE brand. Fisher & Paykel (now owned by Haier, the same parent company as GE Appliances) is the closest equivalent — contact Fisher & Paykel Australia at 1300 650 590 for parts support.
Relax Shipping Creases
Best for: Replacement seals that arrive folded, twisted, or compressed.
How to do it:
- Lay the gasket flat at room temperature for several hours.
- Soak distorted sections in hot tap water, or use a hair dryer on low.
- Move the heat continuously and stop when the vinyl becomes flexible.
Expected result: The gasket installs easily and sits flatter against the cabinet.
Install a Press-Fit GE Gasket
Best for: Many modern GE French-door and bottom-freezer models.
How to do it:
- Pull the old gasket straight out from one upper corner.
- Clean and dry the retaining groove with a microfiber cloth and plastic putty knife.
- Seat all four corners first, then press the barbed edge into each straight section.
Expected result: The seal remains secure without screws or adhesive.
Install a Screw-Retained GE Gasket
Best for: Older GE doors with visible screws or a retaining strip beneath the gasket lip.
How to do it:
- Loosen each screw two or three turns with a Klein Tools #2 Phillips screwdriver or 1/4-inch nut driver.
- Remove the old seal while keeping the inner liner square.
- Insert the new gasket and tighten the screws gradually in alternating sections.
Expected result: The gasket stays centered without bowing the plastic door liner.
Correct Door and Mullion Alignment
Best for: A new gasket that still leaks at a GE French-door center or upper corner.
How to do it:
- Confirm the center mullion rotates and enters its cabinet guide.
- Remove heavy bottles from door bins and check for uneven door height.
- Level the cabinet with the front slightly higher than the rear.
Expected result: The door closes naturally and the seal contacts the cabinet evenly.
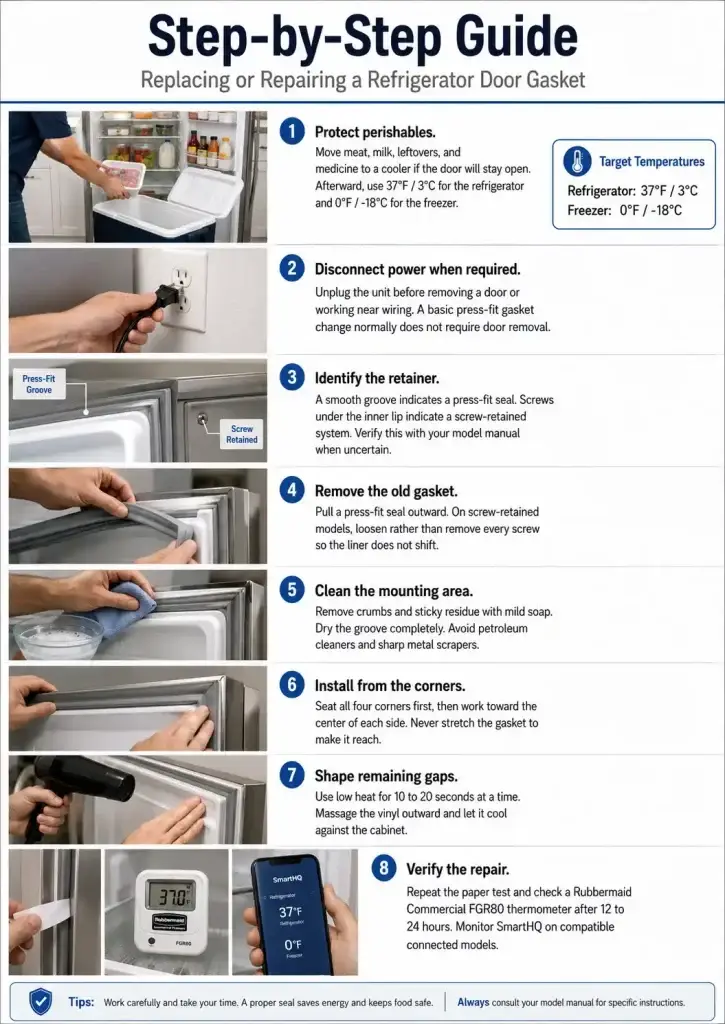
Step-by-Step Guide
- Protect perishables. Move meat, milk, leftovers, and medicine to a cooler if the door will stay open. Afterward, use 37°F / 3°C for the refrigerator and 0°F / -18°C for the freezer.
- Disconnect power when required. Unplug the unit before removing a door or working near wiring. A basic press-fit gasket change normally does not require door removal.
- Identify the retainer. A smooth groove indicates a press-fit seal. Screws under the inner lip indicate a screw-retained system. Verify this with your model manual when uncertain.
- Remove the old gasket. Pull a press-fit seal outward. On screw-retained models, loosen rather than remove every screw so the liner does not shift.
- Clean the mounting area. Remove crumbs and sticky residue with mild soap. Dry the groove completely. Avoid petroleum cleaners and sharp metal scrapers.
- Install from the corners. Seat all four corners first, then work toward the center of each side. Never stretch the gasket to make it reach.
- Shape remaining gaps. Use low heat for 10 to 20 seconds at a time. Massage the vinyl outward and let it cool against the cabinet.
- Verify the repair. Repeat the paper test and check a Rubbermaid Commercial FGR80 thermometer after 12 to 24 hours. Monitor SmartHQ on compatible connected models.
Should You Replace the GE Gasket Yourself or Call a Technician?
Replace it yourself if:
- The refrigerator is outside its warranty period (GE standard warranty: 1 year limited in the US and Canada; GE Profile and Café may carry extended warranties check your documentation)
- Only the gasket is damaged no cracked liner, no hinge damage, no compressor symptoms
- You can identify the mounting system and source the correct OEM part number before ordering
Call GE or a technician if:
- The refrigerator is within its warranty period DIY replacement may void coverage, particularly on GE Profile and Café models
- The inner door liner is cracked, the mounting channel is broken, or the hinge is visibly bent
- Fresh-food temperatures stay above 40°F (4°C) after 24 hours with a new gasket in place this points to a sealed-system, fan, or sensor issue beyond the gasket
- You own a GE Monogram built-in column refrigerator these have complex door assemblies that benefit from factory-trained service
GE Appliances support contacts:
US & Canada: 1-800-432-2737 | GE Profile / Café: 1-800-444-3199 | UK: 0800 054 5059
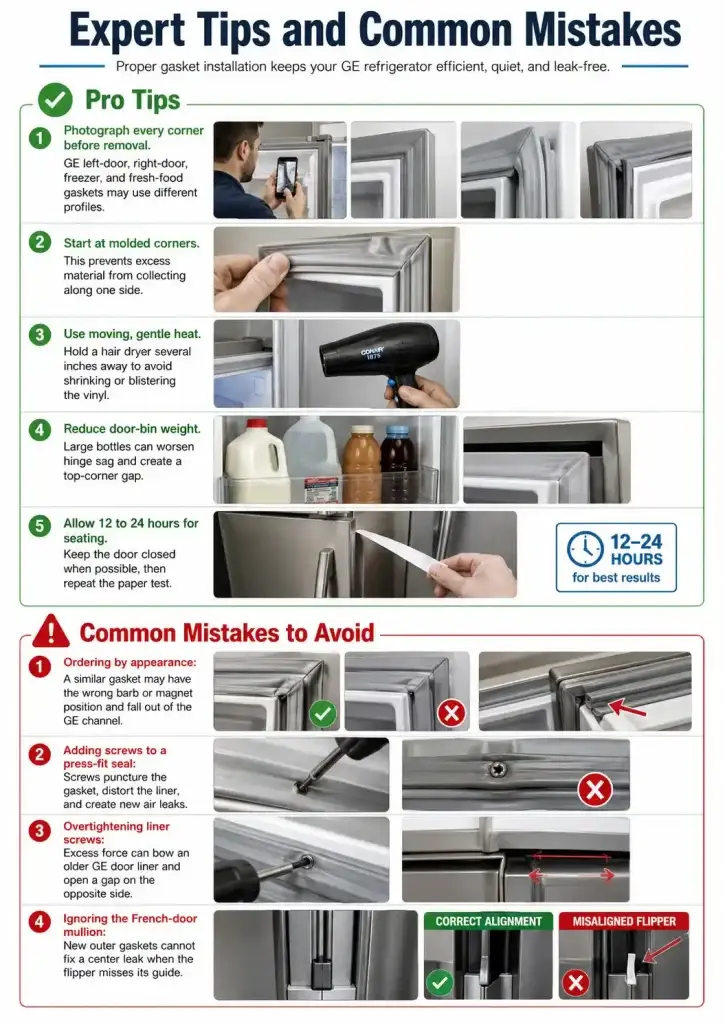
Expert Tips and Common Mistakes
- Photograph every corner before removal. GE left-door, right-door, freezer, and fresh-food gaskets may use different profiles.
- Start at molded corners. This prevents excess material from collecting along one side.
- Use moving, gentle heat. Hold a hair dryer several inches away to avoid shrinking or blistering the vinyl.
- Reduce door-bin weight. Large bottles can worsen hinge sag and create a top-corner gap.
- Allow 12 to 24 hours for seating. Keep the door closed when possible, then repeat the paper test.
Common Mistakes to Avoid
- Ordering by appearance: A similar gasket may have the wrong barb or magnet position and fall out of the GE channel.
- Adding screws to a press-fit seal: Screws puncture the gasket, distort the liner, and create new air leaks.
- Overtightening liner screws: Excess force can bow an older GE door liner and open a gap on the opposite side.
- Ignoring the French-door mullion: New outer gaskets cannot fix a center leak when the flipper misses its guide.
For routine refrigerator maintenance, wipe the gasket monthly and remove sticky syrup from its folds. Follow practical food storage tips by leaving air vents open and keeping containers behind shelf edges. Good kitchen organization protects the seal and supports stable cooling.
After installation, listen for unusually long compressor cycles and inspect the door edge for condensation. If one section repeatedly loosens, remove that section and reseat the barb rather than pushing only on the visible face. A fully seated gasket should look straight, feel secure, and resist paper consistently.
FAQs
How long does it take to replace a GE refrigerator door seal?
A press-fit GE gasket usually takes 30 to 60 minutes, including cleaning and shaping. A screw-retained design may take 60 to 90 minutes because the liner must stay square during tightening. Allow 12 to 24 hours for folded vinyl to relax and for compartment temperatures to stabilize.
How do I find the correct GE refrigerator gasket?
Use the complete model number from the tag inside the fresh-food or freezer compartment. Match the exact door position, color, and listed part number. GE gasket numbers often begin with WR24X or WR14X, but that prefix alone does not confirm compatibility. Do not order only by measuring the old seal.
Do all GE refrigerator door seals press into a groove?
No. Many GE French-door and newer bottom-freezer models use magnetic gaskets that press into a groove-retaining channel. Some older top-freezer and side-by-side models use screws or a retaining strip. Because GE has no reliable universal year cutoff, inspect beneath the gasket lip and verify the system with your model manual.
Why is my new GE gasket not sealing?
The seal may still have shipping creases, an edge may not be seated, or the door may be misaligned. Warm the affected section gently, massage it toward the cabinet, and keep the door closed for several hours. On French-door units, inspect the center mullion and remove heavy items from the door bins.
Should I glue a GE refrigerator door gasket?
Usually, no. A GE press-fit gasket relies on its barbed edge and groove, while a screw-retained design relies on the liner and retaining strip. Adhesive can hold the seal in the wrong position and complicate later service. Use it only when the exact model instructions specifically require it.
What temperature should I check after replacing the seal?
Check a refrigerator thermometer after 12 to 24 hours. Aim for about 37°F / 3°C in the refrigerator and 0°F / -18°C in the freezer. If readings remain high, confirm the door closes fully, vents are clear, and the gasket grips paper around the entire opening.
How much does it cost to replace a GE refrigerator door seal?
An OEM replacement gasket for a standard GE refrigerator typically costs between $30 and $60 USD. GE Profile gaskets range from $45 to $85, and GE Café or Monogram gaskets can reach $60 to $110 depending on door size and configuration.
A professional appliance technician in the US typically charges $120 to $200 including labor. Because GE is one of the most widely stocked brands for appliance parts, OEM gaskets are usually available with fast shipping making DIY replacement a practical option for most out-of-warranty GE owners.
Conclusion
Knowing how to replace GE refrigerator door seal correctly can stop warm-air leaks, reduce condensation, control frost, and help maintain safe food temperatures. The most important step is ordering by the complete GE model number rather than appearance or measurements alone.
Inspect the mounting system before removal. Modern groove-retained seals press into place, while some older doors use screws beneath the inner lip. Warm folded areas gently, seat the four corners first, and correct any French-door mullion or hinge issue that blocks full contact.
A successful repair should produce firm paper-test resistance and stable readings near 37°F / 3°C after 12 to 24 hours. It should also reduce moisture around the opening and help the door close without extra force. Today, locate your model tag and test the existing seal at every corner before ordering a part.
For more refrigerator tips and appliance guides, explore more at refrigeratorSolve.

Hi, I’m the lead researcher and appliance enthusiast behind RefrigeratorSolve. With years of hands-on experience troubleshooting cooling systems and testing home appliances, I am dedicated to bringing you honest reviews, energy-saving tips, and practical solutions to keep your refrigerator running perfectly.