
That rhythmic snoring coming from your kitchen? It’s almost certainly the compressor doing its job. But when that hum turns into a rumble that won’t quit, something’s off.
In our research into refrigerator noise patterns, we found that most snoring sounds trace back to three fixable issues: dirty condenser coils, an unlevel unit, or a worn door seal. Per manufacturer specifications, a properly functioning refrigerator cycles every 4 to 8 hours and produces between 35 and 50 decibels of sound. That’s roughly the volume of a quiet conversation.
Let’s figure out whether yours is behaving normally or asking for help.
why does my refrigerator sound like its snoring
If your refrigerator sounds like it’s snoring, the compressor is likely running longer than normal or vibrating against a surface. A healthy unit cycles on and off every few hours with a quiet hum. A snoring fridge keeps running and rumbles instead.
The three most common culprits are dirty coils, an unlevel installation, or a bad door seal. Most of these fixes take under thirty minutes and zero special tools.
| Symptom | Most Likely Cause | Cost to Fix |
|---|---|---|
| Steady rumbling hum | Dirty condenser coils | Free if you do it yourself |
| Loud vibration when compressor kicks on | Unlevel refrigerator | Free — adjust the feet |
| Constant loud humming all day | Bad door seal | $30 to $80 for parts |
| Gurgling and bubbling | Normal refrigerant flow | Nothing — this is fine |
The compressor is the heart of your refrigerator. It pumps refrigerant through sealed coils to move heat from inside your fridge to the room outside. When everything works right, you hear a soft hum.
When it struggles, that hum becomes a snore. Refrigerator is making noise covers more background on what those sounds mean.
How a Refrigerator Actually Makes Noise (So You Know What to Listen For)
Your refrigerator makes sound whenever the compressor, fans, and defrost system are running. Most of what you hear comes from one of four sources.
The compressor creates a steady low hum as it pumps refrigerant. That rhythm matches the on-off cycling pattern. If the sound changes pitch or gets louder, the compressor is working harder than it should.
Condenser coils release the heat your fridge removed from the interior. They sit either on the back panel or behind a front kickplate. When dust and pet hair cake those coils, airflow drops.
The compressor runs longer and sounds louder. Clean coils make a noticeable difference in noise level.
The evaporator fan lives inside the freezer compartment. It pushes cold air into both the fridge and freezer sections. When ice builds up around the fan blades, you’ll hear a rattling or grinding noise from inside the unit.
Frost-free models run this fan constantly, which is why freezer noise often signals a defrost problem.
During the defrost cycle, a timer or computer triggers a heater to melt frost on the evaporator coils. The melted water flows down a drain tube into a drip pan. That water movement creates gurgling and bubbling sounds.
The compressor also makes clicking noises when the defrost timer advances. These are normal as long as they don’t become excessive.
Rubber isolator mounts sit under the compressor to absorb vibration. Over time those rubber pads compress and crack. When they fail, the compressor’s vibration transfers directly to the fridge cabinet and the floor.
That transforms a quiet hum into a loud snore that travels through walls.
The Diagnostic Decision Tree: Match Your Sound to the Right Fix

Start by identifying exactly what kind of snoring sound you’re hearing. The answer determines your next move.
Is the sound a steady low hum that cycles on and off?
This is most likely normal compressor operation or dirty condenser coils. Stand near the back bottom of the fridge while listening. The compressor should cycle on for a few minutes and then rest for twenty or thirty minutes.
Clean the coils first. Pull the fridge out, locate the coils behind the front grill or on the back panel, and vacuum them thoroughly. If the noise drops after cleaning, you’ve found your answer.
If the compressor runs for more than four hours straight without turning off, that’s a problem. Call a professional before the compressor burns out.
Is the sound a rattle or buzz that changes when you touch the fridge?
This points to loose components or an unlevel installation. Place your palm on different panels while the noise is active. If pressing a panel stops or changes the sound, that panel is vibrating.
Use a small bubble level on top of the fridge to check the balance. Adjust the front leveling feet until the unit sits evenly. Even a quarter-inch lean creates enough vibration to amplify noise dramatically.
If the rattling comes from inside the compressor area itself rather than the cabinet, the rubber isolator mounts may be worn. That requires a technician to replace them.
Is the sound gurgling or bubbling like liquid moving through pipes?
That’s refrigerant flowing through the coils. It’s completely normal. You’ll hear it most often right after the compressor turns on or during the defrost cycle.
No action needed unless the gurgling is constant and accompanied by poor cooling. That combination suggests a restricted defrost drain or a refrigerant issue.
Is the sound clicking or ticking at regular intervals?
Regular clicking every six to twelve hours usually marks the defrost timer advancing. Intermittent clicking that changes pitch when you open the freezer door points to the evaporator fan hitting ice. Check your What Makes a Refrigerator Make a Loud Noise guide for more on interpreting unusual patterns.
Thick frost behind the freezer interior panel means the defrost system needs attention. A technician can test the heater, bi-metal thermostat, and timer with a multimeter.
The 3 Most Common Fixes You Can Do Yourself Today
Most snoring refrigerators improve after one of these three fixes. Start here before calling anyone.
Fix 1: Clean the Condenser Coils
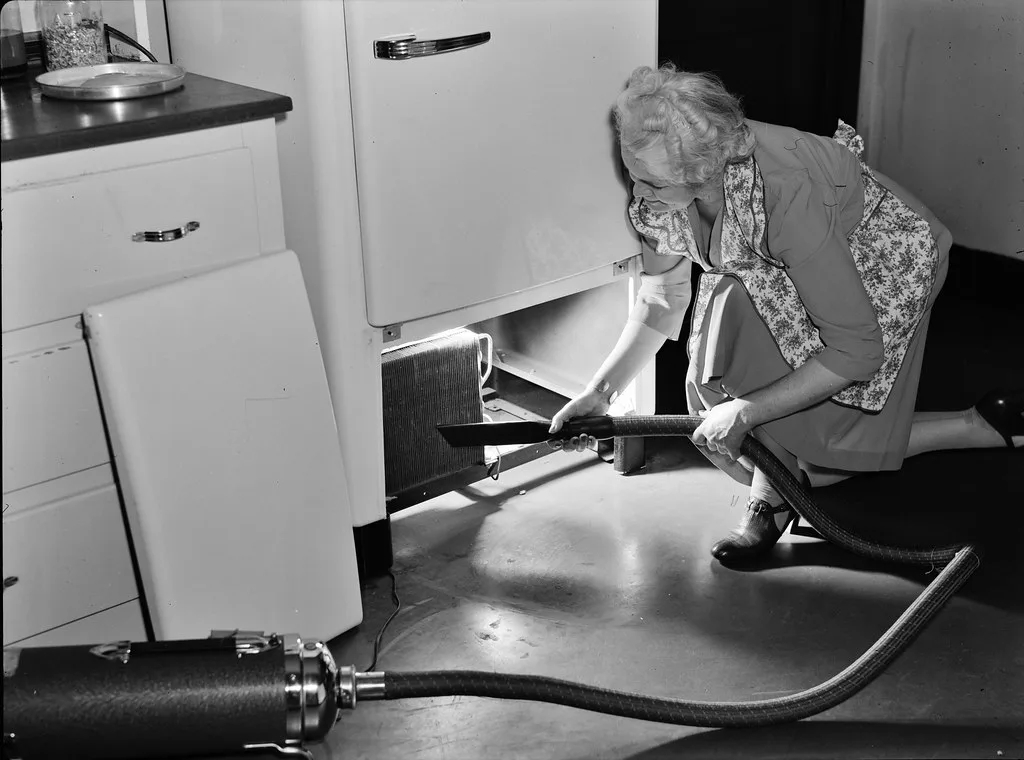
Image source: Openverse / polkbritton (PDM 1.0)
Unplug the refrigerator and pull it away from the wall. Locate the condenser coils. Most modern fridges hide them behind a front kickplate grill.
Older models expose them on the back like a radiator. Use a coil brush or a vacuum with a narrow attachment to remove dust, lint, and pet hair from between the fins. Go slowly so you don’t bend the delicate metal fins.
While the fridge is pulled out, vacuum the drip pan underneath too. Push the unit back, plug it in, and listen. A thorough coil cleaning often reduces compressor noise within the first hour of operation.
Fix 2: Level the Refrigerator

Place a bubble level on top of the fridge. Check both front-to-back and side-to-side. Most refrigerators have threaded leveling feet at the bottom front corners.
Loosen the lock nut with an adjustable wrench, then turn the foot up or down until the bubble centers. Retighten the lock nut once level. Aim for the fridge to tilt backward about a quarter inch so the door closes and latches by itself.
Recheck the level after every adjustment. An unlevel fridge amplifies every compressor vibration into a loud rumble that travels through cabinetry and floors.
Fix 3: Test and Replace the Door Gasket
Close the fridge door on a dollar bill. Pull it out. You should feel steady resistance.
If it slides out easily, the seal isn’t gripping properly. Inspect the rubber gasket for cracks, tears, or flattened spots. Clean the gasket and the metal lip it seals against with warm soapy water.
Food residue and grease can prevent a tight seal even when the rubber looks fine. Wipe everything dry and test again.
If the seal still fails after cleaning, order a replacement gasket for your specific model. A bad door seal lets cold air escape constantly. The compressor runs nonstop to compensate, which creates that loud snoring sound.
Replacing a worn gasket costs between thirty and eighty dollars in parts and takes about twenty minutes. Check our Noise Insulate A Refrigerator guide if you want additional sound reduction tips after the seal is fixed.
What Not to Do: 5 Mistakes That Make Fridge Noise Worse
Homeowners often try to fix fridge noise in ways that make things worse. Avoid these five common mistakes.
Don’t ignore a compressor that won’t cycle off. Running continuously for more than twenty-four hours will eventually burn out the compressor. Clean the coils and check the seal first.
But if the compressor still won’t turn off after those steps, call a technician immediately. Delaying only increases repair costs.
Don’t push the fridge flush against the wall. Condenser coils need airflow to release heat. Leave at least two inches of clearance behind the unit and one inch on each side.
Blocked airflow forces the compressor to work harder and run longer, which creates more noise.
Don’t overtighten the leveling feet. Forcing the feet can crack the plastic base or strip the threading. Adjust in small quarter-turn increments and recheck the level each time.
You want firm contact with the floor, not maximum torque.
Don’t ignore heavy frost buildup in a frost-free freezer. Thick ice around the evaporator fan means the defrost system has failed. Running the fan blade into ice will destroy the fan motor within days and create a loud grinding noise.
Check the Refrigerator Sound Like A Jackhammer article if your freezer sounds particularly aggressive.
Don’t replace parts blindly based on a single symptom. A clicking sound could be the defrost timer, the evaporator fan, the start relay, or the compressor itself. Diagnose the actual source before buying components.
Wrong part replacements waste money and don’t solve the problem.
When to Call a Professional (And What to Expect)
Some fridge noises require tools and knowledge most homeowners don’t have. Here’s when to stop DIY and call a pro.
Call a technician if the compressor runs continuously for more than twenty-four hours despite clean coils and a good seal. Call if the freezer temperature rises above zero degrees Fahrenheit. Call if you hear loud metallic knocking from the compressor area instead of a smooth hum.
Call if you smell burning insulation near the back of the unit.
A qualified technician will check compressor amperage draw with a clamp meter. They’ll test the start relay and capacitor for proper function. They’ll check the defrost heater continuity and the bi-metal defrost thermostat.
They’ll also inspect the evaporator fan motor and the refrigerant pressure. These tests require proper gauges and electrical knowledge.
The typical service call runs seventy-five to one-fifty dollars for the diagnostic visit. Parts and labor add to that total. A faulty start relay costs fifty to one hundred dollars in parts.
A defrost heater runs forty to eighty dollars. An evaporator fan motor is eighty to one fifty in parts. A full compressor replacement runs two hundred to four hundred dollars in parts plus labor.
On a refrigerator older than ten years, a compressor replacement often costs more than the remaining value of the unit.
The Refrigerator Makes A Loud Noise page breaks down more scenarios where professional help is the smarter choice.
Preventing the Snoring Noise: A Simple Maintenance Schedule
Preventing compressor noise comes down to routine maintenance. Most snoring problems develop slowly over months or years. Regular upkeep stops them before they start.
Follow this schedule and your fridge stays quiet for years.
Every Six Months: Clean the Coils and Check the Seal
Vacuum or brush the condenser coils twice a year. This simple task takes twenty minutes and dramatically reduces compressor workload. While the fridge is pulled out, inspect the door gasket for cracks or stiffness.
Clean both the rubber and the metal surface it seals against.
Test the seal with the dollar bill method. If any section slides out easily, note it for replacement. Addressing seal issues early prevents the compressor from running overtime and creating that loud snoring sound.
Once a Year: Level the Unit and Inspect the Drip Pan
Place a bubble level on top of the fridge and check all directions. Adjust the front leveling feet if needed. Retighten the lock nuts after each adjustment.
Remove the drip pan and clean it with warm soapy water. Check for cracks or warping. A cracked drip pan causes water to leak onto the floor when the defrost cycle runs.
Replace it if damaged. The Noise From A Refrigerator Aqua Pure guide covers more maintenance details for specific model types.
Every Two to Three Years: Professional Defrost System Check
If you own a frost-free refrigerator, schedule a professional inspection every two or three years. A technician can test the defrost heater, bi-metal thermostat, and drain line before they fail completely.
Early detection of defrost system problems prevents ice buildup around the evaporator fan. That’s one of the leading causes of loud grinding and rattling noises in frost-free models. Catching issues early saves hundreds in potential repairs.
After Any Move or Reinstallation
Always relevel the refrigerator after moving it. Check that the condenser coils aren’t crushed or kinked against the wall. Test the door seal immediately after repositioning.
Even a small tilt from moving creates enough vibration to trigger snoring noises.
Consistent maintenance keeps the compressor cycling normally. That single habit prevents most noise complaints and extends the life of your refrigerator significantly.
Final Verdict: How to Decide Your Next Step
Here’s the simplest way to decide what to do next. Start with the three DIY fixes we covered earlier. Clean the condenser coils.
Level the refrigerator. Test and replace the door gasket if needed. These three steps solve the majority of snoring-noise complaints according to our research.
Watch the compressor cycle for twenty-four hours after making those changes. If the noise drops and the unit cycles off normally, you’ve fixed the problem. If the snoring continues or the compressor won’t turn off, move to the diagnostic decision tree and identify which branch matches your sound.
Call a professional if the noise persists after DIY attempts, if the compressor runs nonstop, or if cooling performance drops. Don’t attempt sealed-system repairs yourself. Refrigerant handling requires certification, and compressor work involves electrical components that can be dangerous.
For additional guidance on interpreting different noise patterns, check the What Makes A Refrigerator Humming Noise resource. And if you’re considering a new unit, our 5 Best 4 Door Refrigerator picks include models known for quieter compressor operation.
Your fridge has been serving you faithfully. Sometimes it just needs a little maintenance or professional attention to stop the snoring and keep running smoothly for years to come.
Frequently Asked Questions About Why Does My Fridge Sound Like It’s Snoring
Is it normal for my fridge to make noise at night?
Yes, if the sound is a rhythmic hum that cycles on and off. Nighttime makes it more noticeable because the kitchen is quiet. Your bedroom may also be close to the kitchen or garage where the fridge sits.
That proximity amplifies normal compressor sounds.
Why does my fridge sound louder after I cleaned the coils?
That shouldn’t happen. If the noise increased after cleaning, you may have loosened a panel or bumped a component. Another issue like a bad door seal might also need attention.
Return the fridge to its position carefully and listen again.
Can an uneven floor really make my fridge snore?
Absolutely. An unlevel fridge transfers compressor vibration directly into the floor and cabinetry. Even a quarter-inch lean creates enough amplification to turn a quiet hum into a loud rumble.
Leveling the unit usually eliminates this type of noise completely.
My fridge is gurgling and making knocking sounds. Should I be worried?
Gurgling alone is normal refrigerant flow. Knocking or ticking that happens rhythmically usually marks the defrost cycle. If the knocking is loud and constant, or if cooling seems affected, call a technician to check the defrost system.
How do I know if the compressor is failing versus just loud?
A failing compressor often runs constantly, trips breakers, smells like burning insulation, or makes loud metallic knocking instead of smooth humming. If the fridge isn’t keeping food cold and the compressor feels hot to the touch, it’s likely failing.
Will replacing old parts actually quiet my refrigerator?
Yes, if worn components are the cause. New rubber isolator mounts, a clean evaporator fan, or a fresh door gasket can dramatically reduce noise. Start with the simplest fixes first before investing in part replacements.