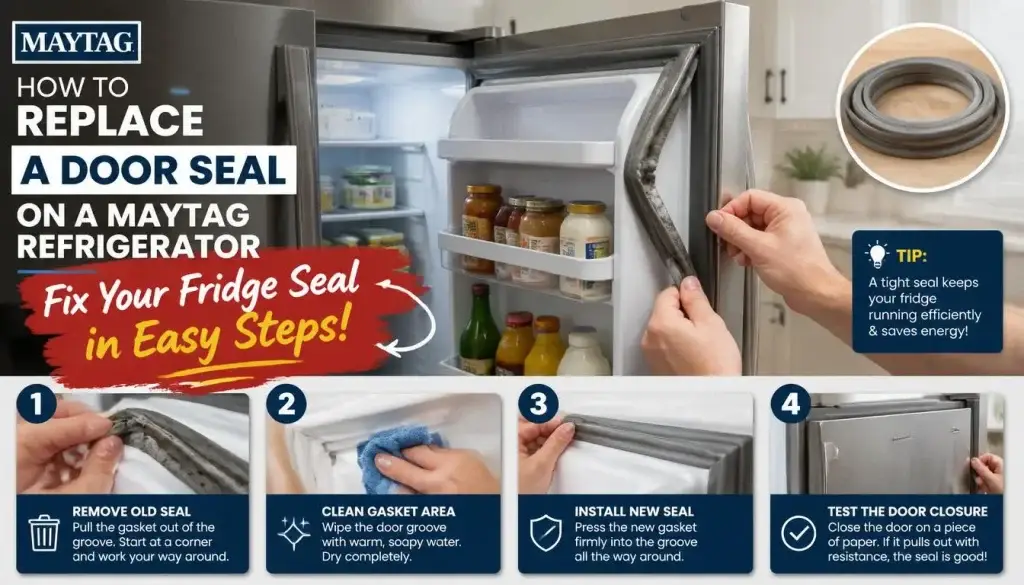
To replace a door seal on a Maytag refrigerator, disconnect power, identify the correct gasket using the full model number, pull the old press-fit gasket from its channel or loosen its retaining screws, clean the mounting area, and install the new seal from the corners inward. Close the door for two hours before testing it.
Which Gasket Mounting System Does Your Maytag Have?
Identify this before reading further, it takes 60 seconds and determines your entire removal method.
Step 1: Open the refrigerator door and find the inner gasket edge at the top corner.
Step 2: Gently lift the rubber inner lip with one finger.
- You feel a plastic dart or rib pressed into a groove → Press-fit system. Common on Maytag models produced from approximately 2006 onward. Skip to “Install a Press-Fit Maytag Gasket.”
- You see small screws or a retaining strip → Screw-retained system. Common on Maytag models from the 1990s through early 2000s. Skip to “Install a Screw-Retained Maytag Gasket.”
- French-door model? Also inspect the left-door vertical mullion. If it folds outward rather than inward, this not the perimeter gasket may be your air leak source.
- Unsure? Search your full model number on partselect.com, the parts listing confirms the mounting type for your exact unit.
A torn, loose, or flattened refrigerator door seal can create several frustrating problems. Your Maytag refrigerator may run longer than normal, frost may form near the door, or refrigerated food may feel warmer even when the control is set correctly.
Learning how to replace a door seal on a Maytag refrigerator can solve these issues without replacing the entire appliance. The repair is usually manageable with basic hand tools, but the correct method depends on the model. Many modern Maytag refrigerators use a press-fit gasket. Older models may secure the gasket beneath a retaining strip with screws.
The model number matters because two Maytag refrigerators that look similar can use different gasket dimensions, corner profiles, colors, and mounting systems. Modern OEM gasket numbers often follow formats such as W10830055 or W10830189. Older Maytag parts may use numeric formats such as 67003547. These numbers are examples, not universal replacements.
This guide explains how to identify your Maytag gasket system, select the correct part, remove the damaged seal, install the replacement without stretching it, test the repair, and avoid common mistakes that cause new seals to leak.
Why a Damaged Maytag Refrigerator Door Seal Matters
The door gasket creates a flexible barrier between the refrigerator cabinet and the room. A magnetic strip inside the gasket pulls it against the cabinet when the door closes. When that contact becomes uneven, warm and humid air can enter the appliance.
You may first notice condensation on shelves, frost around the freezer opening, or moisture along the gasket. The compressor may also run for longer periods because the cooling system must remove the heat entering through the gap.
A leaking seal can affect food storage. Milk, meat, seafood, and prepared meals need a stable refrigerator temperature. Keep the fresh-food compartment near 37°F or 3°C and the freezer near 0°F or -18°C. Use a Taylor Precision Products 5924 refrigerator thermometer to confirm the actual temperature instead of relying only on the control-panel setting.
Before ordering a gasket, locate the complete Maytag model number. On top-freezer, bottom-freezer, French-door, and four-door models, the label is commonly inside the fresh-food compartment on the left side. On many side-by-side models, it is inside the refrigerator compartment on the right. Some older units place it near the upper front liner or beside the crisper area.
Did You Know: A refrigerator with a leaking door gasket may continue cooling, but it often runs longer and develops moisture because warm room air repeatedly enters the cabinet.
Do not order a replacement using door measurements alone. The correct gasket must match the model number, door position, color, magnetic profile, and mounting channel.
Best Ways to Replace a Maytag Refrigerator Door Gasket
Confirm That the Seal Needs Replacement
Best for: Homeowners who see moisture or temperature changes but cannot find visible gasket damage.
How to do it:
- Clean the gasket with mild dish soap, warm water, and a soft microfiber cloth.
- Close the door on a strip of paper at the top, bottom, hinge side, and handle side.
- Replace the gasket if the paper slides out with little resistance in several areas after cleaning.
Expected result: You confirm whether the gasket is damaged or whether dirt and door alignment caused the leak.
Find the Exact Maytag Replacement Gasket
Best for: Anyone ordering a gasket for a French-door, side-by-side, top-freezer, or bottom-freezer model.
How to do it:
- Copy the full model number, including every letter and final revision digit.
- Identify the affected door, such as left refrigerator, right refrigerator, freezer drawer, or freezer door.
- Match the OEM part number to the complete model before purchasing it.
Expected result: You receive a gasket with the correct dimensions, corners, color, and mounting profile.
What a Maytag replacement gasket costs and where to find it:
- PartSelect.com — Best US source for Maytag OEM gaskets with full model-number search
- AppliancePartsPros.com — Large inventory, fast US and Canada shipping
- RepairClinic.com — Excellent for older Maytag numeric-format part numbers
- Amazon — Third-party options available; verify dart profile matches OEM before ordering
- ReliablePartsCanada.ca — Best option for Canadian Maytag owners
- eSpares.co.uk — For UK-based Maytag owners
Expected cost: OEM Maytag replacement gaskets typically cost $30–$80 USD ($40–$105 CAD). Maytag is a Whirlpool-family brand, so some gaskets are shared across Maytag, Whirlpool, and Amana model lines — always confirm against your exact model number before ordering.
Note for Australian readers: Maytag appliances are not sold in Australia. If you arrived at this guide while searching for a similar brand, contact Whirlpool Australia at 1300 945 784 for the closest equivalent parts support.
Identify the Maytag Gasket Mounting System
Best for: Owners who are unsure whether to pull the gasket out or loosen screws.
How to do it:
- Lift the inner edge of the old gasket without tearing it.
- Look for a smooth molded channel, which normally indicates a press-fit gasket.
- Look for screws beneath the inner lip, which indicates a retaining-strip system.
Expected result: You remove the old gasket without damaging the plastic door liner.
Many Maytag refrigerators produced from approximately 2006 onward commonly use a press-fit, barbed, or dart-style gasket. Many legacy models from the 1990s through the early 2000s may use a screw-retained strip. Model families overlap, so there is no dependable year-only cutoff. Verify this with your model manual before removing anything.
Prepare the New Door Seal
Best for: Replacement gaskets that arrive folded, twisted, or compressed in packaging.
How to do it:
- Unpack the gasket and compare its corners and mounting profile with the old seal.
- Place it in warm water for 10 minutes or warm creased areas with a hair dryer on low.
- Keep the dryer at least 6 inches away and move it continuously to avoid melting the vinyl.
Expected result: The new gasket becomes flexible enough to sit evenly around the door.
Install a Press-Fit Maytag Gasket
Best for: Most newer Maytag French-door, bottom-freezer, and side-by-side refrigerators.
How to do it:
- Push the gasket’s mounting dart into the channel at all four corners first.
- Seat the center of each side before filling the remaining gaps.
- Press around the complete perimeter with your thumb without pulling or stretching the seal.
Expected result: The gasket remains square and creates even magnetic contact around the cabinet.
Install a Screw-Retained Maytag Gasket
Best for: Older Maytag refrigerators with screws hidden beneath the gasket’s inner edge.
How to do it:
- Loosen each screw two or three turns using a Phillips screwdriver or 1/4-inch nut driver.
- Pull the old gasket from beneath the retaining strip while supporting the liner.
- Position the new gasket under the strip, square the corners, and tighten the screws gradually.
Expected result: The gasket stays secure without warping the inner door panel.
Correct Door Alignment After Installation
Best for: Doors that still show a gap after the new seal is installed.
How to do it:
- Remove heavy bottles and overloaded Rubbermaid Brilliance containers from the door bins.
- Check the cabinet with a level and raise the front slightly if your manual permits it.
- Adjust the approved hinge or leveling screw in small quarter-turn increments.
Expected result: The door closes under its own weight and compresses the gasket evenly.
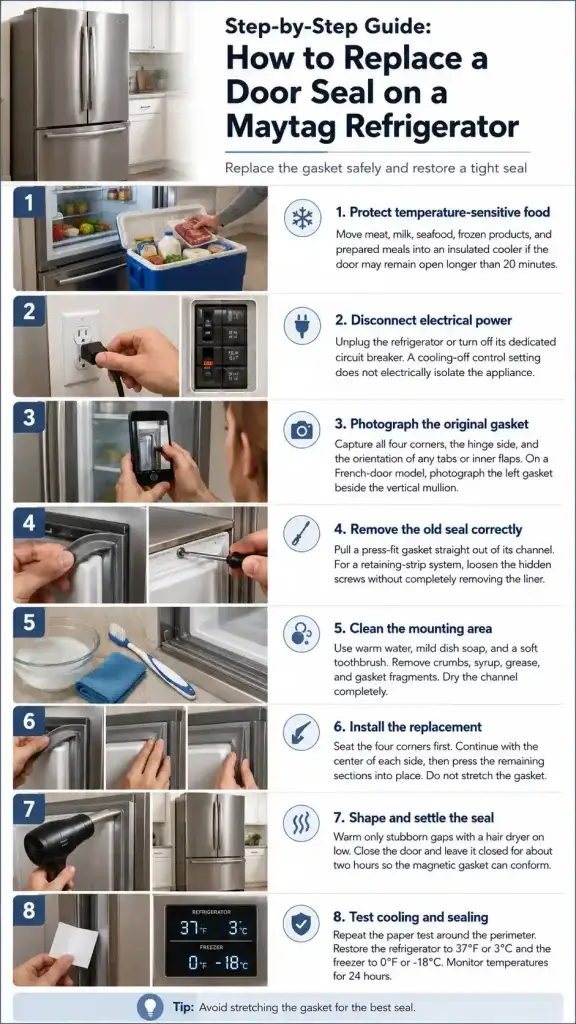
Step-by-Step Guide
- Protect temperature-sensitive food. Move meat, milk, seafood, frozen products, and prepared meals into an insulated cooler if the door may remain open longer than 20 minutes.
- Disconnect electrical power. Unplug the refrigerator or turn off its dedicated circuit breaker. A cooling-off control setting does not electrically isolate the appliance.
- Photograph the original gasket. Capture all four corners, the hinge side, and the orientation of any tabs or inner flaps. On a French-door model, photograph the left gasket beside the vertical mullion.
- Remove the old seal correctly. Pull a press-fit gasket straight out of its channel. For a retaining-strip system, loosen the hidden screws without completely removing the liner.
- Clean the mounting area. Use warm water, mild dish soap, and a soft toothbrush. Remove crumbs, syrup, grease, and gasket fragments. Dry the channel completely.
- Install the replacement. Seat the four corners first. Continue with the center of each side, then press the remaining sections into place. Do not stretch the gasket.
- Shape and settle the seal. Warm only stubborn gaps with a hair dryer on low. Close the door and leave it closed for about two hours so the magnetic gasket can conform.
- Test cooling and sealing. Repeat the paper test around the perimeter. Restore the refrigerator to 37°F or 3°C and the freezer to 0°F or -18°C. Monitor temperatures for 24 hours.
Should You Replace the Maytag Gasket Yourself or Call a Technician?
Replace it yourself if:
- The refrigerator is outside its warranty period (Maytag standard warranty: 1 year limited in the US and Canada)
- Only the gasket is damaged — liner is intact, hinges are straight, no compressor symptoms
- You have confirmed the mounting system and sourced the correct OEM part number
Call a technician or Maytag support if:
- The refrigerator is still within its warranty — DIY repair may void coverage
- The plastic door liner is cracked or the mounting channel is broken
- Temperatures stay above 40°F (4°C) in the fresh-food section after 24 hours with a new gasket — this points to a sealed-system, sensor, or fan issue
- The door sags visibly and the hinge appears bent or loose beyond a simple alignment adjustment
Maytag support contacts:
US & Canada: 1-800-344-1274
UK (Maytag EU): 0800 015 8600
Expert Tips and Common Mistakes
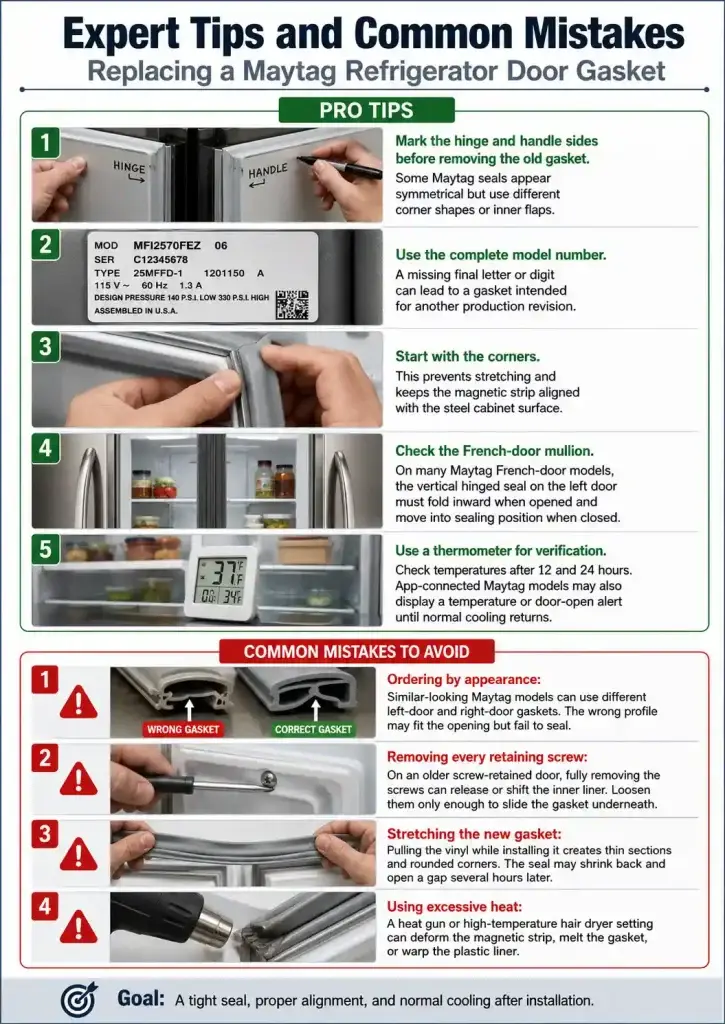
- Mark the hinge and handle sides before removing the old gasket. Some Maytag seals appear symmetrical but use different corner shapes or inner flaps.
- Use the complete model number. A missing final letter or digit can lead to a gasket intended for another production revision.
- Start with the corners. This prevents stretching and keeps the magnetic strip aligned with the steel cabinet surface.
- Check the French-door mullion. On many Maytag French-door models, the vertical hinged seal on the left door must fold inward when opened and move into sealing position when closed.
- Use a thermometer for verification. Check temperatures after 12 and 24 hours. App-connected Maytag models may also display a temperature or door-open alert until normal cooling returns.
Common Mistakes to Avoid
- Ordering by appearance: Similar-looking Maytag models can use different left-door and right-door gaskets. The wrong profile may fit the opening but fail to seal.
- Removing every retaining screw: On an older screw-retained door, fully removing the screws can release or shift the inner liner. Loosen them only enough to slide the gasket underneath.
- Stretching the new gasket: Pulling the vinyl while installing it creates thin sections and rounded corners. The seal may shrink back and open a gap several hours later.
- Using excessive heat: A heat gun or high-temperature hair dryer setting can deform the magnetic strip, melt the gasket, or warp the plastic liner.
Never apply petroleum jelly, cooking oil, or harsh solvent to a Maytag gasket. These products collect debris and may damage the vinyl. Clean water and mild dish soap are safer for regular refrigerator maintenance.
FAQs
How do I know which door seal fits my Maytag refrigerator?
Find the complete model number inside the refrigerator compartment and identify the exact door being repaired. Modern Maytag gasket numbers often begin with W or WPW, while older parts may use a numeric format. Do not rely only on dimensions. Confirm the part against your model and production revision before ordering.
Can I replace a Maytag refrigerator gasket without removing the door?
Yes. Most press-fit and retaining-strip gaskets can be replaced while the door remains attached. Removing the door is normally unnecessary and creates extra risks around hinge wiring, water tubing, and door alignment. Follow the model manual if a specific Maytag design requires door removal.
How long should a new refrigerator door seal take to settle?
Keep the door closed for about two hours after installation. Minor shipping creases may continue relaxing over the next 24 hours. During that period, maintain the refrigerator near 37°F or 3°C and repeat the paper test after the gasket has reached cabinet temperature.
Why is my new Maytag door gasket not sealing at the corners?
The gasket may be stretched, twisted, cold, or incompletely seated in the channel. Remove and reinstall the affected corner without pulling it. Warm the area gently with a hair dryer on low, close the door, and hold the gasket against the cabinet until it cools.
Should I use adhesive on a Maytag refrigerator door seal?
Do not add adhesive unless the service instructions for your exact model require it. Most modern Maytag gaskets use a press-fit mounting dart, while older designs fit beneath a screw-retained strip. Adhesive can prevent future removal and may hold the gasket in the wrong position.
What should I check if the refrigerator still runs constantly?
Confirm that the gasket passes the paper test around the entire door. Then check door alignment, food packages, shelves, door bins, and the French-door mullion. Measure the internal temperature for 24 hours. If it cannot maintain about 37°F or 3°C, the appliance may have another cooling problem.
How much does it cost to replace a Maytag refrigerator door seal?
An OEM Maytag replacement gasket typically costs between $30 and $80 USD depending on your model and door position. Because Maytag is part of the Whirlpool family, some gaskets are shared across brands, which can make compatible parts easier to find.
A professional appliance technician in the US typically charges $100 to $180 including labor for this repair, making DIY replacement a practical option for most out-of-warranty Maytag owners.
Conclusion
Knowing how to replace a door seal on a Maytag refrigerator can reduce moisture, stabilize food temperatures, and prevent the compressor from working harder than necessary. The most important step is identifying the correct gasket through the full Maytag model number.
Determine whether your refrigerator uses a press-fit channel or a screw-retained strip before removing the old seal. Clean the mounting surface, install the corners first, and avoid stretching the replacement. On Maytag French-door models, pay special attention to the left-door gasket and vertical mullion.
After installation, keep the door closed for two hours. Then test the seal with paper and monitor the fresh-food compartment at 37°F or 3°C and the freezer at 0°F or -18°C for 24 hours.
Today, inspect your Maytag gasket for tears, hardened sections, loose corners, and areas that fail the paper test.
For more refrigerator tips and appliance guides, explore more at refrigeratorSolve.

Hi, I’m the lead researcher and appliance enthusiast behind RefrigeratorSolve. With years of hands-on experience troubleshooting cooling systems and testing home appliances, I am dedicated to bringing you honest reviews, energy-saving tips, and practical solutions to keep your refrigerator running perfectly.