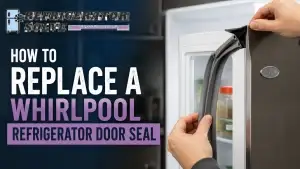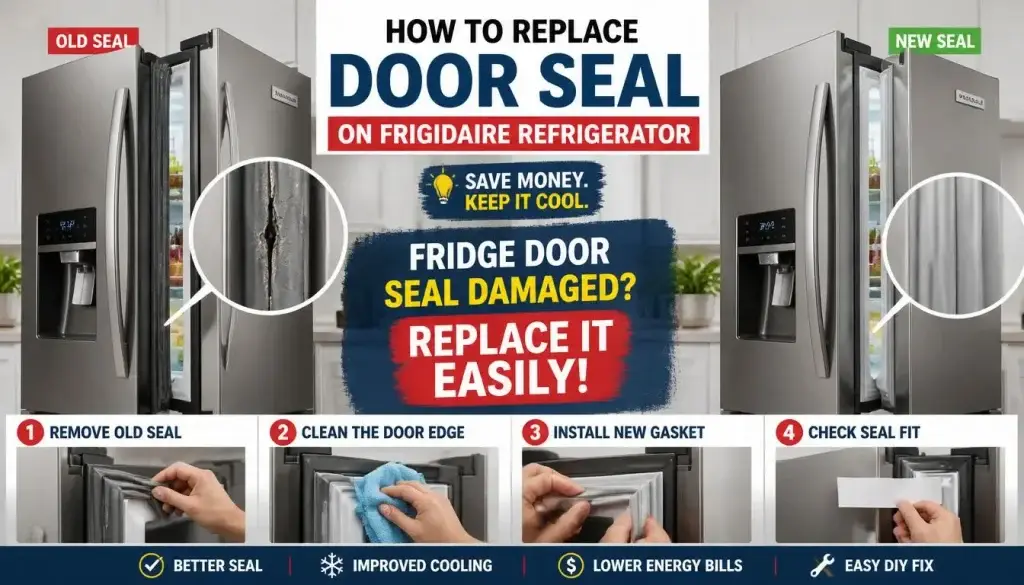
To replace a Frigidaire refrigerator door seal, confirm the gasket using the full model number, unplug the appliance, pull the old gasket from its channel or loosen its hidden retainer, clean the mounting area, and install the new seal corners-first. Finish with a paper test and restore temperatures to 37°F (3°C) and 0°F (-18°C).
Which Gasket Mounting System Does Your Frigidaire Have?
Identify this before reading further, it determines which removal method applies to you.
Step 1: Open the refrigerator door and locate the inner edge of the gasket at the top corner.
Step 2: Gently lift the inner rubber lip with one finger.
- You see a flexible plastic dart or rib pressed into a molded groove → Press-fit system. Skip to the “Install, Shape, and Verify the Seal” section.
- You see small hex screws or a plastic retaining strip → Screw-retained system. Loosen screws carefully, do NOT pull the gasket before loosening.
- Reversible-door Frigidaire model? Your gasket may need to be rotated 180 degrees during installation, this is covered in Step 7 of the step-by-step guide below.
- Still unsure? Search your full model number on partselect.com, the part listing specifies the mounting type for your exact unit.
A torn, hardened, or twisted refrigerator gasket can turn a small door problem into warm milk, freezer frost, condensation, and a compressor that seems to run all day. Learning how to replace door seal on Frigidaire refrigerator models can solve the air leak before it becomes a larger cooling problem.
The job is usually manageable at home, but Frigidaire does not use one attachment method across every refrigerator. Many models use a press-fit gasket with a flexible “dart” that locks into a door channel. Other doors may use screws beneath the inner lip or a retaining strip. There is no safe model-year-only rule: a 2019 top-freezer manual documents a dart-in-channel design, while screw-retained systems must be confirmed by exact model. Verify this with your model manual.
The safest approach is to identify the exact model, inspect how the existing seal is mounted, and install the matching OEM-style part without stretching it. This guide explains how to find the Frigidaire model number, identify the gasket system, remove and fit the seal, correct warped corners, test the repair, and avoid mistakes that cause repeat air leaks.
Why a Frigidaire Refrigerator Door Seal Matters
The door seal creates the flexible magnetic barrier between the refrigerator cabinet and the moving door. When it fails, warm, humid kitchen air enters each time the cooling system tries to stabilize. You may notice moisture near the frame, frost on packages, soft ice cream, a high-temperature alert, or food spoiling sooner than expected.
A poor seal also makes refrigerator maintenance harder. The compressor and fans may run longer because cold air keeps escaping. On app-connected or AI-assisted cooling models, the control system may compensate by increasing cooling activity, but smart controls cannot repair a physical gap in the gasket.
Before replacing the part, rule out simple causes. A gallon jug, drawer, shelf, or crowded door bin can stop the door from closing. Grease and crumbs can also prevent the magnetic face from contacting the cabinet. Good kitchen organization and sensible food storage tips often solve a “bad seal” complaint without parts.
Frigidaire model labels are placed by refrigerator type. On many top-freezer units, look on the upper-left wall inside the fresh-food compartment. On French-door and side-by-side models, check the upper-right interior wall. Record the complete model number, including the final revision digit.
Frigidaire OEM gasket numbers are numeric and may contain nine or ten digits, such as 241786013 or 5304529569. Similar-looking seals can have different corner geometry, magnet position, color, and mounting ribs.
This guide covers all Frigidaire refrigerator lines, including standard Frigidaire models (model prefixes FFHS, FFSS, FFTR), Frigidaire Gallery (FGHB, FGHS, FGHF), and Frigidaire Professional (FPBC, FPBS, FPBG). All three lines use the same OEM gasket replacement process described in this guide.
The gasket part numbers differ by model, but the installation method press-fit dart or screw-retained flange, is the same across the product family. If you own a Gallery or Professional model, use your full model number to confirm the exact replacement part before ordering.
Did You Know: A refrigerator door gasket must seal around the full perimeter. One open corner can admit humid air, create frost, and cause unstable compartment temperatures even when the rest of the seal looks normal.
Best Ways to Replace a Frigidaire Door Gasket
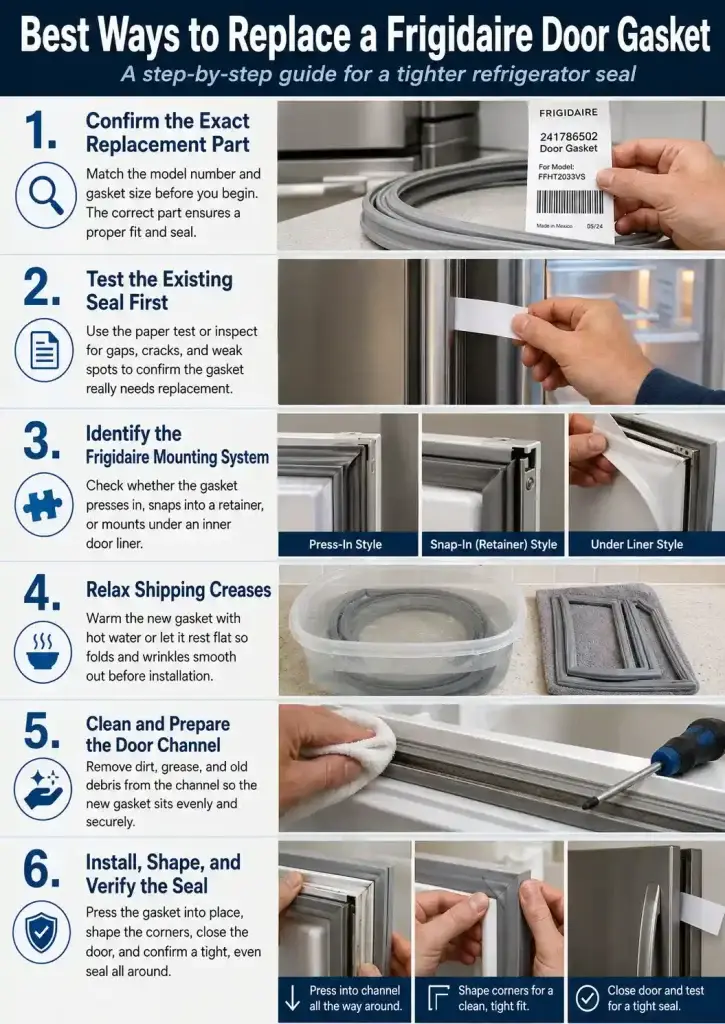
Confirm the Exact Replacement Part
Best for: Anyone ordering a gasket before removal.
How to do it:
- Photograph the model label and record the full number and door position.
- Match the OEM number, corner shape, color, and mounting profile.
- Compare both gaskets before removing the old one.
Expected result: You avoid a similar-looking but incompatible seal.
What a Frigidaire replacement gasket costs and where to find it:
- PartSelect.com — Best for US Frigidaire OEM parts with model-number search
- AppliancePartsPros.com — Large inventory, fast US and Canada shipping
- RepairClinic.com — Strong for older Frigidaire and Frigidaire Gallery models
- Amazon — Third-party compatible options available; verify dart profile matches OEM
- ReliablePartsCanada.ca — Best option for Canadian Frigidaire owners
Expected cost: OEM Frigidaire replacement gaskets typically cost $25–$75 USD ($35–$100 CAD in Canada). Third-party gaskets cost less but may not match the original dart profile precisely — for press-fit systems, OEM fit is strongly recommended.
Note for Australian readers: Frigidaire refrigerators are not widely sold in Australia. If you found this guide while searching for a similar brand, Westinghouse and Electrolux (both Electrolux-owned, as is Frigidaire) use compatible service networks, contact Electrolux Australia at 1300 363 640 for parts guidance.
Test the Existing Seal First
Best for: Doors with condensation, temperature drift, or frost.
How to do it:
- Clean the gasket with warm water, mild dish soap, and a soft microfiber cloth.
- Close the door on a paper strip at the top, bottom, hinge side, and handle side.
- Replace it only if paper still slides out easily after cleaning and reseating.
Expected result: You confirm the gasket is actually faulty.
Identify the Frigidaire Mounting System
Best for: Owners unsure how the gasket is attached.
How to do it:
- Lift the inner lip gently without cutting or stretching it.
- Look for a press-fit dart in a channel, hidden screws, or a retaining strip.
- If the method is unclear, verify this with your model manual before removal.
Expected result: You avoid damaging the inner liner or hardware.
Relax Shipping Creases
Best for: A folded, flattened, or twisted new gasket.
How to do it:
- Lay the gasket flat in a warm room for several hours.
- Warm creases with a Conair 1875-Watt dryer on low from 6 inches away.
- Stop heating when the vinyl becomes flexible; never allow it to feel hot or glossy.
Expected result: The gasket becomes flexible and easier to seat.
Clean and Prepare the Door Channel
Best for: Channels with mold, crumbs, or sticky residue.
How to do it:
- Unplug the refrigerator and move perishable door items into a cooler.
- Clean the empty channel with mild soap and a soft Oral-B manual toothbrush.
- Dry the groove fully and inspect the plastic liner for cracks or bent sections.
Expected result: The new gasket locks into a clean, dry channel.
Install, Shape, and Verify the Seal
Best for: Press-fit Frigidaire gaskets.
How to do it:
- Seat all four corners first, then press the dart into the channel toward the middle of each side.
- Close the door and warm only visible gaps while shaping by hand.
- Paper-test the perimeter and monitor a Taylor 5924 thermometer for 24 hours.
Expected result: The door seals evenly and cooling stabilizes.
Step-by-Step Guide
- Disconnect power. Unplug the refrigerator. Move temperature-sensitive food into a cooler.
- Locate the model number. Check the upper-left wall on top-freezer units or upper-right wall on many French-door and side-by-side units.
- Confirm the attachment. Press-fit gaskets pull from a corner. Screw-retained types require loosening hidden screws. Verify this with your model manual when uncertain.
- Remove the old gasket. Pull a press-fit seal outward in short sections. For retained types, loosen screws only enough to release the flange.
- Clean the area. Use warm water and mild detergent. Clear the corners and dry the channel fully.
- Install without stretching. Seat all four corners, then press 4- to 6-inch sections toward each side’s center.
- Correct open areas. Close the door. Warm a small gap on low heat and massage it toward the cabinet. On applicable reversible-door models, Frigidaire instructions may call for removing the gasket, rotating it 180 degrees, and reinstalling it corners-first.
- Test and stabilize. Restore power, set 37°F (3°C) and 0°F (-18°C), paper-test the perimeter, and allow up to 24 hours to stabilize.
Should You Replace the Frigidaire Gasket Yourself or Call a Technician?
Replace it yourself if:
- The refrigerator is out of its warranty period (Frigidaire standard warranty: 1 year parts and labor in the US and Canada)
- Only the gasket is damaged, no cracked liner, no hinge sag, no compressor symptoms
- You can confirm the mounting system and source the correct OEM part
Call a technician or Frigidaire support if:
- The refrigerator is within its warranty — DIY replacement may void coverage
- The inner door liner is cracked or the mounting channel is broken
- Temperatures stay above 40°F (4°C) in the fresh-food section after 24 hours with a new gasket installed, this suggests a sealed-system or sensor issue beyond the gasket
- The door hinge is visibly bent or the door does not hang level
Frigidaire support contacts:
US: 1-800-374-4432 | Canada: 1-800-265-8352
Expert Tips and Common Mistakes
- Mark the top edge before removal. A small piece of painter’s tape carefully preserves orientation, especially on a reversible-door Frigidaire gasket.
- Start at the corners. Corners control alignment. Seating long sides first can leave excess material or pull a corner out of position.
- Use low heat only. Keep a hair dryer moving and at least 6 inches from the vinyl to avoid shrinking the gasket or warping the door liner.
- Check door alignment before blaming the new seal. A sagging door can create a handle-side gap. Some Frigidaire side-by-side doors use a 7/16-inch adjustment, while certain French-door models use a 6 mm Allen adjustment; verify your manual.
- Measure performance, not just appearance. Use a Taylor 5924 or equivalent refrigerator thermometer and confirm approximately 37°F in the refrigerator and 0°F in the freezer after 24 hours.
Common Mistakes to Avoid
- Ordering by dimensions alone: Two Frigidaire gaskets may look identical but use different dart profiles or magnetic placement. The wrong part may fit the opening yet leak at the corners.
- Pulling before checking for screws: Forcing a retained gasket can tear the flange, bend the retaining strip, or crack the inner plastic door liner.
- Stretching the gasket during installation: Pulled vinyl often retracts later, leaving a gap at the top or bottom corner.
- Judging the repair immediately: A folded replacement may need several closed-door hours to relax. Reopening the door repeatedly prevents the magnetic face from conforming to the cabinet.
FAQs
How long does it take to replace a Frigidaire refrigerator door seal?
Most press-fit replacements take 30 to 60 minutes after the correct part is ready. Screw-retained designs may take longer because the fasteners must be loosened evenly. After installation, keep the door closed as much as possible and allow up to 24 hours for the refrigerator to stabilize at 37°F and the freezer at 0°F.
Does a Frigidaire door gasket need glue?
Usually, no. Many Frigidaire refrigerator gaskets use a press-fit dart that locks into a molded channel. Other models secure the gasket flange beneath screws or a retaining strip. Adhesive can prevent future removal and may hold the seal in the wrong position. If your original gasket was bonded, verify this with your model manual before applying anything.
Why is the new Frigidaire refrigerator seal not closing?
The gasket may be creased, partially seated, installed in the wrong orientation, or pulled too tightly along one side. Recheck all four corners, press the mounting dart fully into the channel, and warm only the open area on low heat. Also confirm that shelves, drawers, and door bins are not blocking closure and that the door is level.
Can I use a universal gasket on a Frigidaire refrigerator?
A cut-to-fit universal seal is rarely the best choice for a modern Frigidaire door. Corner shape, magnetic strip location, thickness, and mounting profile affect closure. Use the full model number to match an OEM-style part, such as the correct 241-series or 53045-series gasket for that model. Never assume a matching length means full compatibility.
How do I find the correct Frigidaire gasket part number?
Open the refrigerator and photograph the complete model label. Check the upper-left interior wall on many top-freezer units and the upper-right wall on many French-door or side-by-side models. Search by the entire model number, including the revision suffix, then confirm the listed door position. Compare the new gasket profile with the original before installation.
When should a technician replace the Frigidaire door seal?
Call for service when the inner door liner is cracked, the door is visibly sagging, the hinge is damaged, or the gasket channel will not hold the mounting dart. Professional help is also appropriate when temperatures remain above 40°F in the fresh-food section after 24 hours, because the problem may involve airflow, sensors, defrost components, or the sealed cooling system.
How much does it cost to replace a Frigidaire refrigerator door seal?
The OEM replacement gasket typically costs between $25 and $75 USD depending on your Frigidaire model and door position. Frigidaire Gallery and Professional models may cost slightly more due to larger door dimensions. If you complete the repair yourself, that gasket cost is the only expense.
A professional appliance technician in the US typically charges $100 to $180 including labor for this service, making DIY replacement worthwhile for most homeowners whose refrigerators are out of warranty.
Conclusion
Replacing a damaged gasket restores the barrier that keeps cold air inside and humid kitchen air outside. The most important part of learning how to replace door seal on Frigidaire refrigerator models is matching the exact gasket and identifying its attachment method before removal.
Work with the refrigerator unplugged. Clean the door channel, seat the corners first, avoid stretching the vinyl, and use low heat only where a crease creates a visible gap. Then perform the paper test around all four sides and confirm temperatures with a refrigerator thermometer.
A properly fitted seal can reduce frost, condensation, long run times, and avoidable food spoilage. It also supports better refrigerator maintenance, food storage, kitchen organization, and the efficient operation expected from modern energy-efficient appliances.
Today, photograph your Frigidaire model label and test the existing gasket at all four corners with a strip of paper.
For more refrigerator tips and appliance guides, explore more at refrigeratorSolve.

Hi, I’m the lead researcher and appliance enthusiast behind RefrigeratorSolve. With years of hands-on experience troubleshooting cooling systems and testing home appliances, I am dedicated to bringing you honest reviews, energy-saving tips, and practical solutions to keep your refrigerator running perfectly.