Installing a triple-door refrigerator in a small kitchen is a brilliant space-saving solution that requires careful planning and precise measurement. I’ve done it myself, and with the right approach, you can maximize your kitchen’s efficiency without a full remodel.
My Journey to a Bigger (Yet Smaller) Kitchen
I love to cook. My kitchen, however, did not love my ambition. For years, I battled with a classic top-freezer model that was constantly overflowing. Between fresh produce, meal prep containers, and my questionable habit of buying frozen pizza in bulk, I was constantly playing a frustrating game of Tetris every time I needed an ingredient.
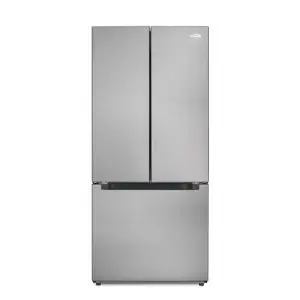
The final straw was when a container of leftover soup exploded onto the crisper drawer because I’d shoved it in one too many items. I knew I needed a major upgrade: a triple-door refrigerator. The French door design with a bottom freezer seemed like the perfect answer more organized space, easier access, and that sleek, modern look I craved.
But then I looked at my kitchen. It’s not a galley kitchen, but it’s far from a sprawling chef’s paradise. The idea of squeezing a large appliance into my existing kitchen layout felt impossible. Was I crazy? Probably. But I was also determined. This is the story of how I successfully installed a triple-door refrigerator in my small kitchen, and my best advice to help you do the same.
Why a Triple-Door Fridge is a Game-Changer for Small Spaces

You might think a bigger fridge is the last thing a small kitchen needs. But the magic of a triple-door model, especially a counter-depth refrigerator, is in its smart design.
- Better Organization: The French doors on top mean you don’t need a wide swing radius like a single door. You can open just one side to grab a jug of milk, which is a huge benefit in a tight space where someone might be walking behind you.
- Efficient Use of Space: The bottom freezer drawer is much easier to access and organize than a deep chest or a top-freezer compartment. You waste less food because you can actually see what’s in there.
- Built-In Look: Many counter-depth models are designed to align nearly flush with your standard countertops and cabinets, creating a built-in, integrated appearance that makes the whole kitchen feel more spacious and less cluttered.
As organization expert Marie Kondo once said:
“The objective of cleaning is not just to clean, but to feel happiness living within that space.”
A well-chosen appliance absolutely sparks that joy by reducing daily frustration.
The Pre-Installation Blueprint: Measure Three Times, Buy Once
This is the most critical phase. Getting this right is the difference between a smooth installation and a costly mistake.
1. Measure Your Space Relentlessly:

Grab a tape measure and write this down. You need four key measurements for the refrigerator opening:
- Height: From the floor to the bottom of any upper cabinets.
- Width: The total space between the cabinets or walls on either side.
- Depth: From the wall to the front of your countertops.
- Pathway: Don’t forget to measure every doorway, hallway, and stairwell the fridge will need to pass through to get to its final spot. This is a common oversight!
2. Understand the Fridge’s True Size:

The dimensions listed on the product spec sheet are for the fridge itself. You must also account for:
- Clearance for Ventilation: Most fridges need extra space at the back (sometimes up to 2 inches) and at the sides for air to circulate. This prevents the compressor from overworking and keeps your energy bills down. Check your new appliance’s manual for the exact requirements.
- Door Swing: While French doors need less room to open than a single door, you still need to ensure they can open fully without hitting walls, counters, or opposite island cabinetry. Account for the door handles, too!
3. Choose the Right Model:

Based on your measurements, you can now shop smart. Look for:
- Counter-Depth Refrigerators: These are less deep than standard models, so they won’t stick out as far into your kitchen, creating a cleaner look and better traffic flow.
- Slim Models: Some brands offer narrower units specifically designed for small kitchens or to fit alongside other appliances.
- Front Ventilation: If space is extremely tight, some models allow for ventilation through the front grill, minimizing the needed side and rear clearance.
Installation Day: A Step-by-Step Guide from My Experience
The big day arrived. My new stainless steel beauty was on the delivery truck. Here’s how the process went down.
Step 1: Prepare the Area.

This is more than just cleaning the floor. You must:
- Remove the Old Fridge: Have a plan for your old appliance. Many retailers offer haul-away services for a small fee when they deliver the new one. This is a lifesaver.
- Turn Off the Water Supply: If your old fridge had a water dispenser or ice maker, locate the shut-off valve (usually under the sink or behind the fridge) and turn it off. Have a towel handy to catch any residual water in the line.
- Turn Off the Power: Locate the circuit breaker that controls the kitchen refrigerator outlet and switch it off. Safety first!
Step 2: The Grand Entrance.

Getting the fridge into the kitchen can be the toughest part. My delivery team used a professional appliance dolly and were experts at pivoting through tight doorways. If you’re doing it yourself, recruit strong friends and use moving blankets to protect your walls and the fridge’s finish. Remove the refrigerator doors if necessary; most models allow for this, and it can save you several precious inches of width.
Step 3: Positioning and Leveling

Once the fridge is in its rough spot, the real work begins.
- Slide It In: Carefully push the fridge back, being mindful of the water line and power cord behind it. Don’t force it if something is catching.
- Level the Unit: This is so important. An unlevel fridge can cause doors to not close properly or swing open on their own. Use a wrench to adjust the front leveling legs, usually located behind the toe grill. Place a level on top of the fridge and adjust the legs until it’s perfectly even from front to back and side to side.
Step 4: Connect Water and Power

- Ice Maker/Water Line: If you have a water line kit, carefully connect it to the valve on the back of the fridge. Turn the water supply back on slowly and check immediately for any leaks at both connection points.
- Power: Plug the fridge into the dedicated outlet. Avoid using an extension cord, as most manufacturers recommend plugging directly into the wall to prevent a fire hazard.
Step 5: The Final Check

Before you start loading it with food, do a final check.
- Ensure the doors open and close freely without obstruction.
- Confirm the unit is level.
- Listen for the gentle hum of the compressor starting up.
- Give the ice maker a few hours to cycle and produce its first batch of ice.
Maximizing Your New Fridge’s Potential
Installation is just the beginning. Now, let’s make it work for you.
- Organization is Key: Use clear bins and lazy Susans in the fridge and freezer sections. This prevents things from getting lost in the back and helps you keep inventory, reducing food waste.
- Understand the Zones: Your fridge has different temperature areas. The door is the warmest (good for condiments), the shelves are consistent (for dairy, drinks), and the crisper drawers have controlled humidity for fruits and veggies.
- Energy Efficiency: To keep your utility bills in check, make sure the door seals are tight. You can test this by closing a dollar bill in the door; if you can pull it out easily, the seal may need adjusting or replacing.
Interior designer Nate Berkus offers a great perspective on this process:
“Your home should tell the story of who you are, and be a collection of what you love.”
Your new appliance is a functional part of that story.
Frequently Asked Questions (FAQ) for How to install a triple door refrigerator in a small kitchen?
How much space do I need around the fridge for ventilation?
This varies by model, but a general rule is 1/8 inch on the sides and 1-2 inches at the back. Always check your owner’s manual for the manufacturer’s specific recommendation. Proper ventilation is crucial for performance and efficiency.
Can I install a refrigerator next to a stove or oven?
It’s not ideal. The heat from the cooking appliance can make the fridge’s compressor work harder, reducing its efficiency and lifespan. If you have no other choice, try to leave at least a few inches of space and consider using a heat-resistant panel as a barrier.
How long should I wait before putting food in my new refrigerator?
Most manufacturers recommend letting the refrigerator run for at least 2-4 hours to allow the internal temperatures to stabilize before adding a full load of food. For the first ice batch, it may take up to 24 hours.
My fridge is making a weird noise. Is that normal?
Some sounds are normal, like the hum of the compressor or the trickle of water filling the ice maker. Loud knocking, buzzing, or rattling could indicate an problem. Consult your manual’s troubleshooting guide or contact the manufacturer.
Conclusion
Installing a triple-door refrigerator in my small kitchen was one of the best home improvements I’ve ever made. It required a weekend of my time, a lot of measuring, and some help from friends, but the result is a kitchen that feels larger, functions better, and brings me genuine joy every day. It’s no longer a source of stress but a centerpiece of my home.
The process is all about preparation. By taking accurate measurements, choosing the right model for your specific kitchen layout, and following the installation steps carefully, you can absolutely achieve a professional-looking result. You’ll gain not just a new appliance, but a more organized, efficient, and enjoyable cooking space.

Hi, I’m the lead researcher and appliance enthusiast behind RefrigeratorSolve. With years of hands-on experience troubleshooting cooling systems and testing home appliances, I am dedicated to bringing you honest reviews, energy-saving tips, and practical solutions to keep your refrigerator running perfectly.