It’s a simple process: you typically just lift the shelf at a slight angle, guide it out of its support rails, and then reverse the steps to place it in a new position. I’ve done this countless times in my own kitchen, and I’m here to walk you through it, making your fridge work better for you.
I remember the day my new triple door refrigerator was delivered. It was sleek, it was shiny, and it promised a new level of kitchen organization. But as I started unloading groceries, I hit a snag. The gallon of milk didn’t fit on the door bin, my favorite pitcher was too tall for the top shelf, and I had no idea what to do with that fancy flex drawer. I stood there, feeling a little frustrated. The fridge was supposed to make life easier, right?
That’s when I decided to get to know my appliance. I spent a good hour just looking at it, pulling out shelves, and testing different configurations. Now, I can say that understanding how to customize the interior of my Samsung, LG, or whatever brand you have is the absolute key to loving your fridge. It’s not just about making things fit; it’s about creating a system that reduces food waste, saves energy, and makes your life more convenient. Let’s break it down together.
Getting to Know Your Triple Door Refrigerator’s Layout
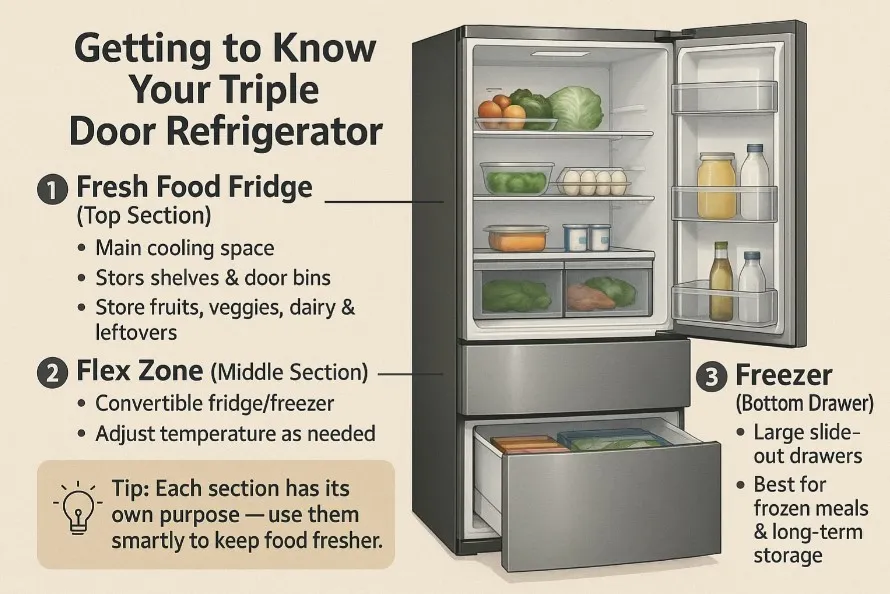
First, it helps to understand what makes a triple door model unique. Unlike traditional top or bottom freezer models, a triple door fridge has three distinct sections:
- The Fresh Food Fridge (Top Section): This is your main cooling area for everyday items. It has multiple glass shelves and door bins.
- The Flex Zone (Middle Section): This is the star of the show! This convertible compartment can be switched between fridge and freezer temperatures. It’s perfect for meats you plan to thaw, drinks for a party, or storing snacks at a slightly cooler temp.
- The Freezer (Bottom Drawer): Usually one or two large, slide-out drawers for frozen goods.
Each of these zones has its own shelving and storage solutions designed for specific needs.
The Step-by-Step: How to Adjust Your Shelves
The basic principle for adjusting most refrigerator shelves is universal, but the exact method can vary slightly by brand. Always refer to your user manual for the most specific instructions for your model. Safety first: unplug your fridge or turn it off at the circuit breaker before making major adjustments to avoid any electrical issues.
Adjusting Glass Shelves in the Fridge Section:
This is the most common adjustment you’ll make.
- Tilt and Lift: Most glass shelves are held in place by front and rear support brackets. To remove one, gently lift the front of the shelf up at a slight angle. You’ll clear the front lip of the bracket.
- Slide Out: Once the front is free, carefully slide the shelf forward and downward to disconnect it from the rear supports.
- Reposition: To place it in a new position, angle the shelf so the back end slides into the rear supports first on your desired level. Then, gently lower the front until it clicks securely into the front bracket.
Pro Tip: If your shelves feel stuck, don’t force them. There might be a small release lever or clip you need to press. A quick look at the manual can save you from a potential breakage.
Organizing the Door Bins:
The plastic bins on the inside of the door are usually even easier to manage.
- Lift and Pull: Most simply lift straight up and out of their tracks. Some might have a release tab you squeeze to unlock them.
- Reposition: You can often move these bins up or down to create more vertical space for taller bottles or condiments.
Configuring the FlexZone Drawer:
The middle flex drawer often comes with its own set of dividers and baskets.
- Dividers: These usually snap in and out of place, allowing you to create separate sections for different types of food.
- Baskets: Like the door bins, they typically lift straight out. You can remove them entirely for large items or adjust their height on different rails.
“The goal of organization is not to create a perfect space, but to create a functional one.” – Marie Kondo
Smart Organization for Maximum Efficiency
Now for the fun part: putting it all together! A well-organized fridge doesn’t just look good; it helps your food last longer and makes meal prep a breeze. Here’s how I like to organize my triple door fridge:
The Main Fridge Compartment:
- Top Shelf: Ready-to-eat foods like leftovers, drinks, and yogurts. This is the most consistent temperature zone.
- Middle Shelf(s): Eggs, dairy products like milk and cheese.
- Bottom Shelf: This is the coldest part of the fridge (cold air sinks). Store raw meat, fish, and poultry here, ideally on a plate to catch any drips and prevent cross-contamination.
- Crisper Drawers (Hydration Drawers): Use these! One for high-humidity (vegetables, herbs), and one for low-humidity (fruits). This controls moisture loss and keeps your produce fresh for days longer.
The Flex Zone – Your Customizable Space:
This is where you get creative. I use mine in fridge mode most of the time.
- Fridge Mode: Perfect for storing deli meats, cheeses, or a selection of drinks for easy access without opening the main door. I also use it for marinating meats—it keeps the smells contained.
- Freezer Mode: Great for overflow freezer goods, ice cream, or freezing individual portions of meals quickly.
The Freezer Drawer:
- Use bins or baskets to group similar items together—vegetables in one, meats in another, prepared foods in a third. This prevents the “freezer abyss” where things get lost forever.
Troubleshooting Common Shelf Problems
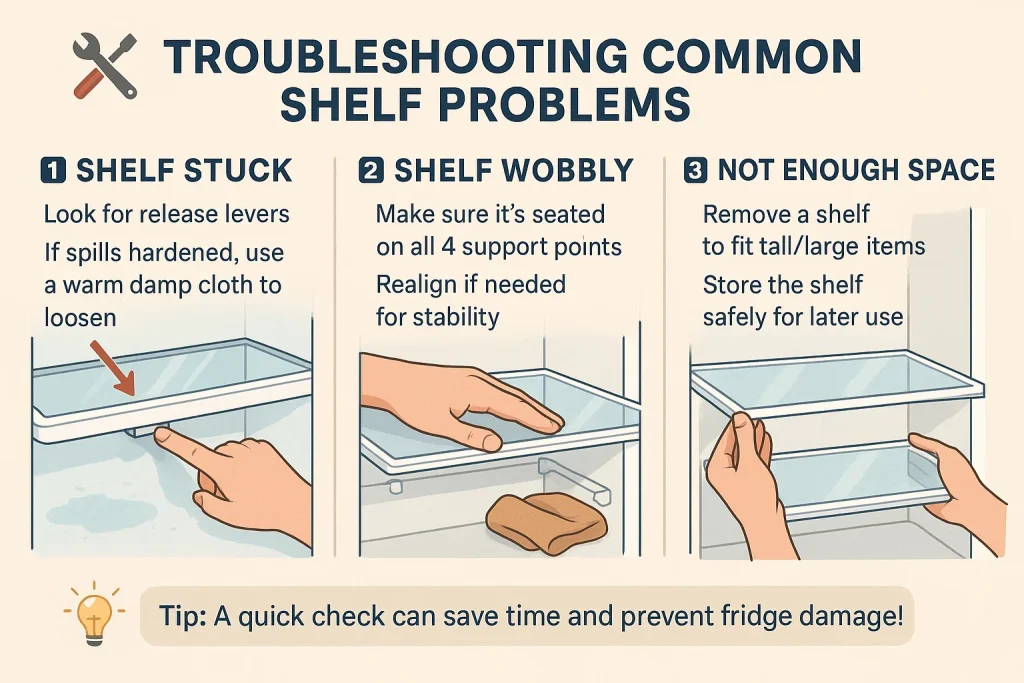
Sometimes, you might run into a small issue. Here’s what I’ve learned:
- Shelves are stuck: Double-check for release levers. If something is spilled and has hardened, you may need to gently warm the area with a damp cloth to loosen the residue.
- Shelves are wobbly: Ensure they are perfectly seated on all four support points. A misaligned shelf won’t be stable.
- Not enough space: Remember, you can often remove a shelf entirely to make room for extra-large items like a big birthday cake or a tall turkey platter. Just store the shelf safely until you need it again.
“Simplicity is the ultimate sophistication.” – Leonardo da Vinci
Frequently Asked Questions for How to Adjust Shelves in a Triple Door Refrigerator?
How often should I clean my refrigerator shelves?
I recommend a quick wipe-down of spills as they happen and a full deep clean where you remove all shelves and bins every 3-4 months. This prevents odors and keeps your food safe.
Can I adjust the temperature in each section of my triple door fridge?
Absolutely! That’s a major benefit. Your main fridge, flex zone, and freezer will all have independent temperature controls. Consult your manual to find the ideal settings for each.
What is the best temperature for my fridge and freezer?
The FDA recommends keeping your refrigerator at or below 40°F (4°C) and your freezer at 0°F (-18°C). I use an inexpensive appliance thermometer to double-check these levels for accuracy.
My fridge has a special feature like an ice maker or water dispenser. Does that affect the shelves?
Usually, no. But be mindful of the water line if you have a through-the-door dispenser. When removing shelves directly behind the dispenser, be gentle to avoid tugging on any internal components.
Where can I find replacement shelves if one breaks?
Contact the manufacturer directly (e.g., Samsung, LG, Whirlpool) or check their official parts websites. You can also find reliable parts suppliers online by searching for your fridge’s model number.
The Heart of the Kitchen
Taking the time to learn how to adjust shelves in a triple door refrigerator transformed my relationship with my kitchen. It stopped being a cold, impersonal box and became a highly efficient tool that supports my family’s routine. It saves me money by reducing spoiled food, saves time by making everything easy to find, and honestly, it just makes me happy to open a well-ordered fridge.
“The kitchen is the heart of the home.”
Remember, there’s no single “right” way to do this. Your fridge should reflect your life. Experiment with different layouts. See what works for your grocery habits. Don’t be afraid to take everything out and start over. A little bit of effort now leads to so much daily convenience later. So go on, give those shelves a gentle lift, and make your fridge truly your own.