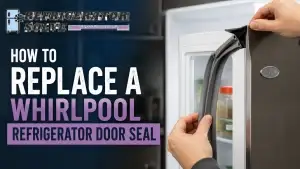
Replacing a mini fridge door gasket is a straightforward repair you can do yourself. You just need to remove the old seal and carefully install the new one to restore cooling efficiency.
My Icy Dilemma: A Story of Cold Air and Warm Wallets
I’ll admit it. For weeks, I ignored the slight warmth on the side of my mini fridge. My energy bill had ticked up a little, and I found myself defrosting it more often, but I was busy. The final straw was a small puddle of water on the floor and a container of yogurt in the back that was decidedly… not cold. I knew what it was. The rubber seal around the door, the gasket, was failing.
That initial sigh of frustration was quickly replaced by the dread of calling a repair service. The cost for a technician to even look at a small appliance like this could easily approach the price of a new unit. But I’m a pretty handy person, and I thought, “There has to be a way to fix this myself.” A bit of research confirmed my suspicion: replacing a mini fridge door gasket is a common and manageable DIY project. I successfully replaced mine, and I’m here to walk you through the exact steps I used, saving you time, money, and that spoiled milk.
What is a Fridge Door Gasket and Why Does it Fail?

Before we grab our tools, let’s quickly understand what we’re working on. The door gasket is that flexible magnetic strip that runs around the entire door frame. Its job is to create an airtight seal when the door is closed, keeping the cold air in and the warm, humid air out.
Over time, this crucial component can wear out. Common reasons include:
- Everyday Use: Constant opening and closing puts stress on the seal.
- Age and Wear: The rubber can become brittle, cracked, or lose its flexibility.
- Dirt and Grime: A buildup of sticky residue can prevent the gasket from sitting flush.
- Heat Exposure: If your mini fridge is in a warm garage or near a heat source, the rubber can degrade faster.
- Physical Damage: Tears or kinks can occur from moving the fridge or catching something in the door.
As one expert noted, “A compromised gasket is one of the leading causes of appliance inefficiency, forcing the compressor to work overtime.” This not only leads to food spoilage but also a noticeable increase in your electricity consumption.
Gathering Your Tools and Replacement Part

The good news is that you don’t need a garage full of fancy equipment for this job. Here’s what you’ll need:
- The Correct Replacement Gasket: This is the most important step. You must get the right part for your specific mini fridge model. The model number is usually on a sticker inside the fridge, on the door frame, or on the back. Write this number down and search for a replacement gasket online or through an appliance parts retailer. A generic seal will likely not fit properly.
- Screwdrivers: Both a flathead and a Phillips head screwdriver are useful. Some models may require a Torx or hex key, but standard screwdrivers are usually sufficient.
- A Putty Knife or Plastic Spudger: This helps to gently pry the old gasket from its channel without damaging the door surface.
- Mild Soapy Water and a Clean Cloth: For cleaning the channel before installing the new gasket.
- A Hair Dryer (Optional but Helpful): If the new gasket is stiff or came tightly folded, a hair dryer on a low heat setting can help warm and soften the rubber, making it easier to work with and helping it sit correctly.
- A Friend (Optional but Recommended): An extra pair of hands can be very useful for holding the door while you work.
The Step-by-Step Replacement Guide
Follow these steps, and you’ll have a fresh, tight seal in no time.
Step 1: Safety First and Preparation
Unplug the mini fridge from the electrical outlet. This is a non-negotiable safety step. Remove all food, shelves, and any racks from the door. I also recommend laying down a towel to catch any drips if the interior is wet.

Step 2: Remove the Old Door Gasket
Now, let’s get the old seal off. Open the fridge door and look closely at how the gasket is attached. You’ll see it is tucked into a metal or plastic retainer strip, often called a channel.
- Locate the Screws: Carefully pull back the edge of the gasket. You will likely find a series of screws hidden underneath that hold the retainer strip in place.
- Remove the Screws: Using the appropriate screwdriver, remove these screws. It’s a good idea to place them in a small bowl so they don’t get lost.
- Gently Pry the Retainer: Once the screws are out, the retainer strip will be loose. Use your putty knife or plastic spudger to gently work the entire retainer and the old gasket out of the door’s groove. Work your way slowly around the entire door until the whole assembly comes free.

Step 3: A Thorough Cleaning
With the old gasket removed, you’ll see the channel where it sat. This area is probably filled with dust, crumbs, and maybe even a bit of mold. Use your cloth and mild soapy water to clean this channel thoroughly. Wipe it dry with a clean cloth. A clean surface is essential for the new gasket to seal properly.

Step 4: Installing the New Gasket
This is the part that requires a bit of patience. Take your new gasket out of the box and let it relax for a few minutes. If it’s kinked from packaging, use the hair dryer on a low setting to gently warm it. This will make the rubber more pliable.
- Start at the Top: I found it easiest to start at the top center of the door. Tuck the lip of the new gasket into the channel.
- Work Your Way Around: Using your fingers, press and work the gasket into the channel all the way around the door. Go slowly. The rubber has a tendency to pop out if you rush. You shouldn’t need any tools for this; your fingers are the best tool to feel that it’s seated correctly.
- Reattach the Retainer Strip: Once the gasket is fully seated in the channel, it’s time to replace the retainer strip. Line it up over the gasket and the channel. Press it into place and begin reinserting and tightening the screws you removed earlier.
- A Note on Corners: The corners can be tricky. Take your time here, ensuring the gasket is folded and fitted neatly into each corner without pinching or buckling.

Step 5: The Final Check and Reassembly
Before you plug the fridge back in, do a final inspection. Run your hand around the entire gasket to feel for any spots that aren’t sitting flat. Once you’re satisfied, you can put the shelves and food back inside. Plug the unit back into the wall.

Testing Your Handy Work
How do you know if you did it right? Here’s a simple test.
- The Dollar Bill Test: Close the fridge door on a dollar bill (or a piece of paper) so that it’s half inside and half outside. You should feel a good amount of resistance when you pull the bill out. Repeat this test at several points around the door. If the bill slides out easily at a certain spot, the gasket isn’t sealing there. You may need to check that the retainer screws are tight or that the gasket is fully seated in the channel at that location.
- Listen and Feel: After the fridge has been running for an hour, the interior should feel consistently cold. The exterior walls should be cool, not warm, and the compressor shouldn’t be running constantly.

As Henry Ford once said, “The only real mistake is the one from which we learn nothing.” Even if your first attempt isn’t perfect, you’ll learn exactly how the seal works and can make adjustments.
Frequently Asked Questions for How to Replace a Mini Fridge Door Gasket
How much does a replacement mini fridge gasket cost?
Typically, a new gasket costs between $20 and $60, depending on the brand and model of your fridge. This is a fraction of the cost of a service call or a new appliance.
Can I use a generic gasket, or do I need the exact model?
I strongly recommend getting the exact replacement part for your model number. A generic gasket may seem like a good deal, but if it doesn’t fit perfectly, you’ll be right back where you started with cooling problems.
How long does it take to replace a fridge door gasket?
For a mini fridge, the entire process should take about 30 to 60 minutes for most people, including cleanup.
Is there any way to clean and repair an old gasket instead of replacing it?
For simple dirt, a good cleaning with soapy water can help. For small tears, there are specialty sealants, but these are temporary fixes. If the gasket is hardened, cracked, or warped, replacement is the only reliable solution.
My new gasket seems stiff. Is that a problem?
Not necessarily. New gaskets can be stiff from packaging. Letting them sit at room temperature and using a hair dryer on a low setting to warm them can make them much easier to install.
Conclusion
Replacing your mini fridge’s door gasket might seem intimidating at first glance, but it’s a classic example of a simple fix that has a huge impact. You don’t need to be a professional technician; you just need the right part, a few common tools, and a methodical approach. The satisfaction of fixing it yourself, combined with the money you’ll save on repairs and your energy bill, is truly rewarding.
You are fully capable of handling this basic appliance maintenance. By taking your time and following these steps, you can extend the life of your mini fridge, improve its performance, and prevent food waste. So, the next time you feel a draft from your fridge door, you’ll know exactly what to do.
As Julia Child famously said, “No one is born a great cook, one learns by doing.” The same is true for home repairs. You learn by doing, and this project is a perfect place to start. Good luck

Hi, I’m the lead researcher and appliance enthusiast behind RefrigeratorSolve. With years of hands-on experience troubleshooting cooling systems and testing home appliances, I am dedicated to bringing you honest reviews, energy-saving tips, and practical solutions to keep your refrigerator running perfectly.