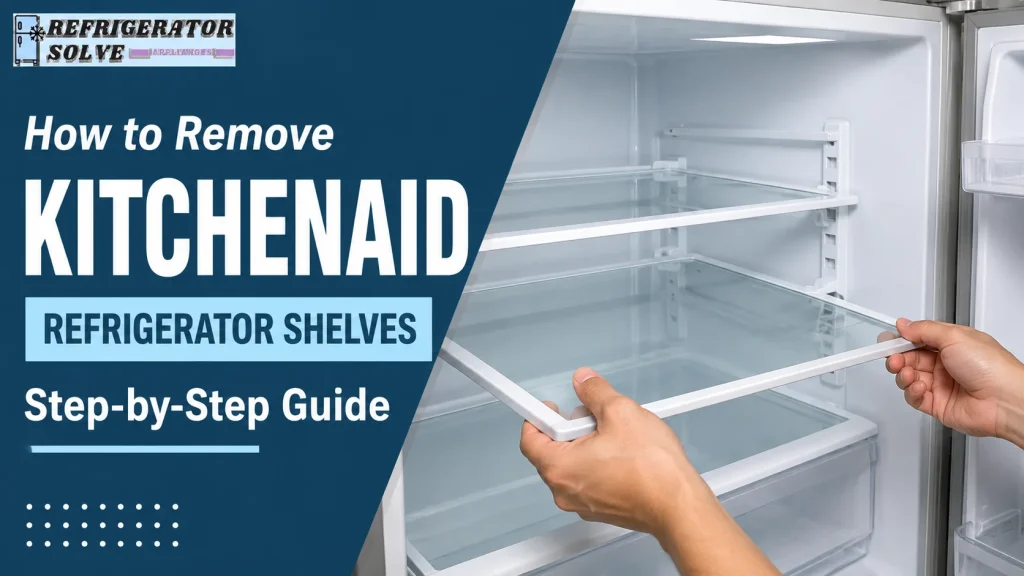
Removing a KitchenAid refrigerator shelf should be simple, but it can become frustrating when the shelf reaches a stop and refuses to move, the glass starts sliding inside the frame, or the refrigerator door seems to be in the way.
The reason is simple: KitchenAid does not use one shelf design across every refrigerator model. Some shelves slide forward and lift over a stop. Others sit on rear hooks and come out by tilting the front upward. Certain French-door models require you to position the doors and shelf mounts correctly before the shelf can be maneuvered through the opening.
Quick answer: To remove most KitchenAid refrigerator shelves, empty the shelf first. If it is a sliding shelf, pull it forward to the stop, lift the front or rear past the stop, and continue pulling it out. If it is a shelf-and-frame style, lift the front edge and raise the shelf away from its supports. Always support glass shelves with both hands.
This guide walks through the different KitchenAid shelf styles, including glass shelves, French-door shelves, top and bottom shelves, crisper covers, Infinity Slide shelves, door bins, and shelves that simply will not come out.
Before Removing Your KitchenAid Refrigerator Shelves
A few minutes of preparation can prevent a cracked shelf, scratched refrigerator liner, or spilled food.
Empty the Shelf Completely
Do not try to remove a shelf with bottles, jars, food containers, or produce still sitting on it.
Even a few items can make a glass shelf surprisingly heavy and difficult to balance. Move everything to another shelf, the counter for a short period, or a cooler if you are planning a longer cleaning session.
If shelf removal is part of a full cleanout, this is also a good opportunity to follow a complete guide on how to clean and organize your fridge.
Identify Which Shelf Design You Have
Before pulling harder, look at how the shelf is attached.
Most KitchenAid refrigerator shelves fall into one of these general designs:
| Shelf type | Typical removal method |
|---|---|
| Sliding glass shelf | Pull forward to the stop, lift past the stop, then slide out |
| Shelf with frame and rear hooks | Tilt the front upward and lift from the supports |
| Shelf on adjustable mounts | Lift from the mounts, then angle it through the door |
| Infinity Slide shelf | Retract the sliding glass before removing the complete shelf |
| Crisper cover | Remove drawers first, then lift the glass insert and frame |
| Door bin or rail | Usually lifts upward or releases from clips |
KitchenAid specifically advises checking the owner’s manual if your shelf style is not covered by its standard removal methods.
Open the Refrigerator Doors Fully—but Not Always Too Far
For a standard shelf, you normally need enough door clearance to pull the shelf outward.
However, some KitchenAid French-door models with adjustable shelf mounts are designed to have the doors positioned at about 90 degrees for shelf removal. Opening the doors wider can actually make it harder to maneuver the shelf through the opening.
This is one of those details that explains why a shelf can feel “too big” to come out even after it has been released from its supports.
Use Both Hands With Glass Shelves
KitchenAid refrigerator glass is typically tempered, but it can still break from impact or sudden temperature changes.
Support a glass shelf with both hands and avoid striking its edges against the refrigerator door, countertop, sink, or floor. KitchenAid also warns against applying warm water to a glass shelf while it is still cold.
How to Remove KitchenAid Refrigerator Shelves
Start with this method if you are not yet sure which shelf style your refrigerator uses.
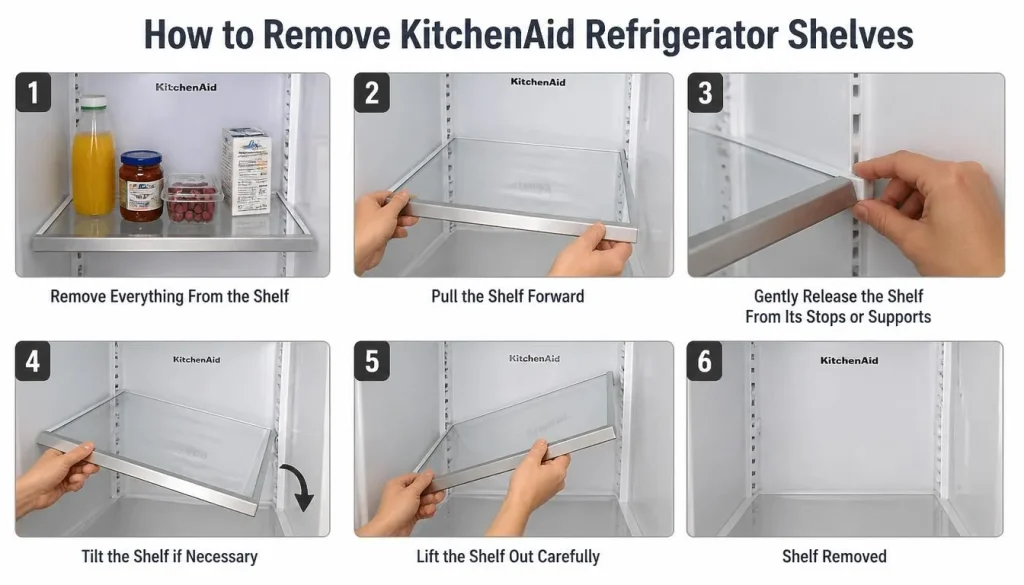
Step 1: Remove Everything From the Shelf
Clear the shelf completely. If anything is underneath it that may interfere with removal, move that as well.
Step 2: Pull the Shelf Forward Gently
Try sliding the shelf straight toward you.
If it moves freely and then stops, you probably have a sliding shelf with a retaining stop.
If it barely moves forward but the front edge can be lifted, you may have a shelf/frame mounted on rear supports.
Step 3: Release the Shelf From Its Stops or Supports
For a sliding shelf, pull it to the stop and gently lift either the front or rear edge—depending on the model—until the shelf clears the stop. Continue sliding it outward.
For a shelf/frame style, raise the front edge so the rear hooks can come out of their supports.
These are the two standard removal methods KitchenAid publishes for many French-door, built-in, and side-by-side refrigerators.
Step 4: Tilt the Shelf if Necessary
Once the shelf is free from the supports, do not assume it will fit straight through the refrigerator opening.
Turn or tilt it slightly while keeping the glass supported.
On some French-door models, the shelf must be brought into a nearly vertical position and rotated at an angle before it will pass through the doors.
Step 5: Lift the Shelf Out Carefully
Keep one hand near each side of the shelf.
Move slowly around:
- Door bins
- Hinges
- Center mullions on French-door refrigerators
- Water-filter housings
- Temperature-control drawers
- Interior lights
If you have to use significant force, stop. A correctly released shelf should not need to be bent or twisted.
How to Remove Glass Shelves From a KitchenAid Refrigerator
“How do I remove the glass shelf from my KitchenAid refrigerator?” is where many owners get stuck because two shelves that look almost identical can use different mounting systems.
Method 1: Sliding Glass Shelf
Use this method if the entire shelf slides toward you.
- Remove everything from the shelf.
- Pull the shelf straight forward.
- Stop when it reaches the built-in retaining stop.
- Lift the front or rear of the shelf—whichever your model allows—past the stop.
- Continue sliding the shelf outward.
- Support it with both hands as it clears the refrigerator.
KitchenAid uses this type of procedure on a number of refrigerator configurations.
Method 2: Glass Shelf With a Frame
If the glass sits in a plastic or metal frame that hooks onto rear supports:
- Grip both sides of the shelf/frame.
- Tilt the front upward.
- Continue lifting until the rear hooks disengage.
- Pull the entire shelf/frame toward you.
- Keep the assembly level enough that the glass does not shift unexpectedly.
Do not immediately pry the glass panel out of the frame. In some assemblies, the glass is intended to remain with the frame during normal shelf removal.
Can You Remove the Glass From the Shelf Frame?
Sometimes—but not every shelf is designed to separate the same way.
If you need to remove the glass specifically because liquid has run underneath it, inspect the underside of the frame for:
- Retaining tabs
- Molded clips
- Removable trim
- Locking channels
If you cannot clearly see how the glass releases, check the owner’s manual using your refrigerator’s full model number rather than prying the plastic frame.
Plastic refrigerator trim becomes less flexible over time, and forcing an unfamiliar clip is an easy way to turn a cleaning job into a replacement-parts job.
How to Remove the Top, Middle, and Bottom Shelves
Certain KitchenAid French-door refrigerators use a shelf-mount system that requires a more specific sequence.
How to Remove the Middle Shelf
On applicable models:
- Set the adjustable shelf mounts to their lower position.
- Position the refrigerator doors at approximately 90 degrees.
- Lift the middle shelf upward and out of the shelf supports.
- Pull it forward.
- Tilt the front downward until the shelf is nearly vertical.
- Turn it slightly at an angle.
- Carefully pull it through the refrigerator opening.
KitchenAid instructs owners of certain configurations to remove the middle shelf before the top shelf.
How to Remove the Top Shelf
After the middle shelf has been removed:
- Lift the top shelf from its supports.
- Move it forward.
- Tilt the front downward.
- Rotate the shelf at an angle.
- Guide it out through the doors.
Removing the middle shelf first creates the clearance necessary to rotate the upper shelf.
How to Remove the Bottom Shelf
The bottom shelf may use a slightly different angle:
- Lift it up and out of the supports.
- Pull it forward.
- Tilt the front upward toward a vertical position.
- Turn the shelf at an angle.
- Guide it through the opening.
Do not apply these exact top/middle/bottom instructions to every KitchenAid refrigerator. They are designed for specific shelf-mount configurations, so use your owner’s manual if your shelf system looks different.
How to Remove Shelves From a KitchenAid French Door Refrigerator
French-door refrigerators can be more awkward because the center opening is narrower than it initially appears.
The shelf can be completely free from its supports yet still seem trapped inside the refrigerator.
For KitchenAid French-door models using adjustable shelf mounts, try this sequence:
- Empty the shelf.
- Move the adjustable shelf mounts into the lower position if your model uses them.
- Open both refrigerator doors to approximately 90 degrees.
- Lift the shelf from the supports.
- Pull it forward.
- Rotate it toward a vertical position.
- Turn one side toward you.
- Guide the shelf through the opening without striking the door.
If the refrigerator has a hinged center mullion on the left door, watch the shelf edge as you remove it. You do not want to hit or bend the mullion.
After completing shelf work, make sure nothing interferes with door closure. If you notice a persistent sealing problem, the guide to how to replace a door seal on a KitchenAid refrigerator explains how KitchenAid door gaskets and French-door sealing components work.
How to Remove Shelves From a KitchenAid Side-by-Side Refrigerator
Many KitchenAid side-by-side refrigerators use the same two general shelf systems discussed earlier.
Sliding Shelf
- Empty the shelf.
- Pull it forward to the stop.
- Lift the front or rear past the stop.
- Pull the shelf the rest of the way out.
Shelf and Frame
- Raise the front edge.
- Lift the assembly out of the shelf supports.
- Pull it toward you.
KitchenAid’s side-by-side guidance confirms both removal styles are used, so do not assume every side-by-side shelf simply slides out.
If you hear rattling after reinstalling a shelf, check that it is seated correctly and that bottles or containers are not vibrating against it. For other unusual sounds, see this guide to KitchenAid refrigerator noises and their causes.
How to Remove an Infinity Slide Shelf
KitchenAid’s Infinity Slide shelf is designed to create space for taller containers by retracting part of the shelf.
Before attempting to remove the complete shelf assembly, push the movable glass section back into its retracted position.
On models where the full shelf is then removed vertically:
- Retract the sliding section.
- Empty the shelf completely.
- Lift the shelf from its supports.
- Keep the glass from sliding forward while tilting the assembly.
- Move the shelf into the removal angle specified for the refrigerator.
KitchenAid specifically warns that the sliding glass should be pushed back and controlled while the shelf is tilted.
To use the Infinity Slide function without removing the shelf, push the adjustable portion toward the rear to create taller storage space. Pull it outward again to return to the full shelf depth.
What About Tuck/Slide Away and Foldaway Shelves?
Some KitchenAid refrigerators use specialty shelves that are designed to change shape or depth without being removed.
Tuck/Slide Away Shelf
To create extra vertical space:
- Slightly lift the front edge of the movable section.
- Push the adjustable portion toward the rear.
- Pull it forward again when you want to restore the full shelf.
Foldaway Shelf
On applicable models, the front section is lifted and pushed back/down so it slides beneath the rear section.
These mechanisms should move smoothly. If they stop abruptly, check for containers, sticky residue, or food debris before applying more pressure.
How to Remove a KitchenAid Shelf With Under-Shelf Lighting
Some KitchenAid refrigerators include shelves with built-in LED lighting.
Treat these shelves differently from a plain glass shelf.
The rear shelf hooks must be completely engaged with the supports when the shelf is reinstalled because the shelf may rely on those contact points for proper electrical operation.
When removing one:
- Empty the shelf.
- Support the complete shelf assembly with both hands.
- Lift it from its mounts using the method specified for your model.
- Avoid wetting electrical contact areas unnecessarily.
- Reinstall it firmly so all required support points make contact.
If the light does not work after reinstalling the shelf, first check whether the rear hooks are fully seated and whether the shelf mounts are clean and dry.
How to Remove the Shelf Above the Crisper Drawers
The large glass shelf above the vegetable drawers is often mistaken for a normal refrigerator shelf. Usually, it is actually a crisper cover assembly.
On many KitchenAid models, you should remove the drawers before trying to remove the glass.
Step 1: Remove the Crisper Drawers
Depending on the model, pull the drawer toward you until it reaches its stop, then lift the front or lift the drawer from its guide.
Do not force the drawer if it locks at a particular position. Some KitchenAid designs require removal before the drawer reaches or engages the final stop.
Step 2: Support the Crisper Glass
Place one hand firmly on the glass so it cannot jump out of the frame.
Step 3: Push the Glass Up From Below
On many KitchenAid models, press upward near the center of the glass insert until its edge rises above the surrounding plastic frame.
Step 4: Slide the Glass Forward
Once released, carefully slide the insert toward you and remove it with both hands.
Step 5: Remove the Frame if Necessary
After the glass is out, lift the plastic cover frame from its side or rear supports.
This method is documented on several KitchenAid crisper-cover designs, but the surrounding drawers and platter compartments can vary by model.
How to Remove KitchenAid Refrigerator Door Shelves and Bins
Door shelves are not always attached like the main refrigerator shelves.
If you are actually trying to remove a door bin, first empty it completely.
Lift-Out Door Bins
Many adjustable door bins release by lifting the entire bin upward and away from its mounting tabs.
Drop-In Door Rails
For a drop-in shelf rail:
- Grip both ends.
- Pull straight upward.
- Lift the rail away from the door.
To reinstall it, align it with the slots and push downward until fully seated.
Snap-In Door Rails
Snap-in rails use locking tabs rather than simple vertical mounts.
KitchenAid’s guidance says certain snap-in rails release by pressing the front of the bracket slightly inward while pulling the inside tab outward, then repeating the process at the other end.
Do not pry aggressively with a screwdriver unless the service instructions for your exact model call for it. Door-liner plastic can crack.
KitchenAid Refrigerator Shelf Won’t Come Out? Try These Fixes
If the shelf feels stuck, more force is rarely the right answer.
The Shelf Has Reached Its Retaining Stop
A sliding shelf is supposed to stop before coming completely out.
Pull it to the stop, then try gently lifting the front. If that does not release it, try the rear, because KitchenAid uses both configurations depending on the model.
The Rear Hooks Are Still Engaged
For framed shelves, lifting only the front a fraction of an inch may not be enough.
Raise it gradually until you can feel the hooks disengage from the rear supports.
The Door Is Blocking the Shelf
This is especially common on French-door refrigerators.
Try positioning both doors at approximately 90 degrees if your model uses the shelf-mount removal system. Oddly enough, opening them wider may reduce clearance on certain configurations.
The Middle Shelf Is Blocking the Top Shelf
On applicable models, remove the middle shelf first.
Trying to rotate the upper shelf while the middle shelf is still installed leaves too little room to maneuver it.
Dried Food Has Glued the Shelf to the Track
Syrup, juice, milk, sauces, and other spills can dry inside shelf channels and make an otherwise removable shelf feel mechanically locked.
KitchenAid notes that spill residue in shelf and drawer channels can cause sticking.
Use a damp, soft cloth to loosen accessible residue. Avoid flooding tracks or electrical contacts.
A Clip or Tab Is Still Locked
Inspect the sides and underside before pulling harder.
A small plastic tab may be almost invisible when viewed from the front.
The Glass Starts Sliding While You Tilt the Shelf
Stop and level the shelf.
If it is an Infinity Slide design, retract the movable glass first and keep it controlled while the shelf is tilted.
Never Force a Stuck Glass Shelf
If the shelf will not move after reasonable lifting and repositioning, look up the full KitchenAid model number and consult that model’s manual.
A replacement plastic trim or glass shelf can cost far more than the extra minute it takes to identify the correct release method.
How to Clean KitchenAid Refrigerator Shelves After Removal
Once the shelf is out, resist the temptation to take a refrigerator-cold glass shelf directly to a sink filled with warm water.
Let Cold Glass Reach Room Temperature
KitchenAid warns that sudden temperature changes can cause glass shelves or covers to break.
Place the shelf somewhere safe and allow its temperature to equalize before washing it with warm water.
Wash With Mild Dish Soap
For most removable refrigerator shelves:
- Use mild dish detergent.
- Wash with a soft cloth or non-abrasive sponge.
- Rinse away soap residue.
- Dry thoroughly with a soft towel.
Avoid abrasive pads that can scratch plastic trim or finishes.
For a broader deep-cleaning routine, the RefrigeratorSolve guide on preventing refrigerator odors covers cleaning removable shelves, drawers, and interior surfaces.
Are KitchenAid Refrigerator Shelves Dishwasher Safe?
Do not assume they are.
KitchenAid says some glass shelves and bins may be dishwasher-safe, but recommends checking the use-and-care guide for the exact model. Hand washing is generally the safer default.
Most importantly, shelves with under-shelf LED lighting are not dishwasher-safe.
Consider Shelf Liners After Cleaning
If spills are the reason you are removing shelves frequently, a removable liner can make routine cleanup easier.
See this RefrigeratorSolve guide to refrigerator shelf liners for options designed to protect glass surfaces from everyday spills and stains.
Make sure any liner you use lies flat and does not block vents, lighting contacts, shelf tracks, or movable sections.
How to Put KitchenAid Refrigerator Shelves Back In
Reinstallation is basically the removal process in reverse—but take the extra few seconds to confirm the shelf is fully seated.
Reinstalling a Sliding Shelf
- Align the rear of the shelf with the cabinet tracks.
- Slide the shelf inward.
- Guide it past the retaining stop.
- Push it completely into position.
- Gently pull forward once to make sure the stop is working.
Reinstalling a Shelf With Rear Hooks
- Hold the front of the shelf slightly raised.
- Align the rear hooks with the supports.
- Lower the hooks into the support slots.
- Lower the front edge.
- Press gently to confirm the shelf is stable.
KitchenAid specifically instructs owners to make sure the rear shelf hooks drop fully into the supports before lowering the front.
Reinstalling a Lighted Shelf
Confirm that all required support points are engaged.
If under-shelf lighting does not work afterward, check:
- Rear hooks are fully seated
- Shelf mounts are clean
- Shelf is touching all required supports
- The refrigerator door has been closed and reopened
How to Adjust KitchenAid Refrigerator Shelf Height
If you removed the shelf simply because you need room for taller bottles or containers, complete removal may not always be necessary.
Some KitchenAid shelves sit on adjustable mounts with flippers that can be changed between positions.
The general method is:
- Lift the shelf from the mounts.
- Rotate the shelf-mount flipper to the desired orientation.
- Repeat on each mount.
- Replace the shelf.
- Press downward gently to make sure it is properly seated.
KitchenAid also offers retractable shelf designs that let you create extra vertical storage without changing the shelf height.
Common Mistakes to Avoid
A KitchenAid shelf is usually easier to remove when you avoid these common mistakes.
Pulling Harder When the Shelf Stops
A stop often means “lift here,” not “pull harder.”
Trying to Remove a Loaded Shelf
Even a few bottles make glass harder to balance and increase the chance of dropping it.
Holding Heavy Glass With One Hand
Use two hands whenever possible.
Washing Refrigerator-Cold Glass With Warm Water
Let the glass reach room temperature first.
Assuming Every KitchenAid Refrigerator Is the Same
French-door, side-by-side, built-in, bottom-freezer, and quad-door models may use different shelf arrangements.
Forgetting to Retract a Sliding Shelf
Infinity Slide and similar designs should be returned to a controlled position before the complete shelf is tilted.
Ignoring Rear Hooks During Reinstallation
A shelf that looks installed can still be sitting slightly above its supports.
This can cause instability and, on certain lighted shelves, prevent the lights from operating properly.
When Should You Replace a KitchenAid Refrigerator Shelf?
Cleaning cannot fix every shelf problem.
Consider replacement if you find:
- Cracked or chipped glass
- Broken plastic frame corners
- Damaged mounting hooks
- Missing retaining clips
- Bent metal supports
- A shelf that no longer sits level
- A sliding section that repeatedly separates from its track
Avoid attempting to glue structurally damaged glass or heavily loaded shelf supports.
When ordering a replacement, use the refrigerator’s complete model number, not simply “KitchenAid French-door refrigerator.” Similar-looking refrigerators can use different shelf dimensions and mounting points.
Frequently Asked Questions
How do you remove shelves from a KitchenAid refrigerator?
Empty the shelf first. For a sliding shelf, pull it forward to the stop, lift the front or rear past the stop, and slide it out. For a framed shelf, tilt the front upward and lift the rear hooks from their supports. Exact procedures vary by model.
How do you remove a glass shelf from a KitchenAid refrigerator?
Support the shelf with both hands. If it slides, pull it to its stop and lift it past the retaining point. If the glass sits in a hooked frame, tilt the front of the entire assembly upward and lift the frame from the supports.
Why won’t my KitchenAid refrigerator shelf come out?
The shelf may still be caught on a retaining stop, rear support hook, mounting tab, door obstruction, or dried spill. Some French-door models also require the doors and adjustable shelf mounts to be positioned correctly before the shelf can be angled out.
How do you remove the top shelf from a KitchenAid refrigerator?
On certain French-door models, remove the middle shelf first. Lift the top shelf out of its supports, pull it forward, tilt it toward a vertical position, turn it at an angle, and guide it through the door opening.
How do you remove the middle shelf from a KitchenAid refrigerator?
On models with adjustable shelf mounts, place the mounts in their lower position, open the doors to about 90 degrees, lift the shelf from the supports, pull it forward, tilt it down vertically, rotate it, and remove it.
How do you remove the bottom shelf?
For applicable French-door shelf-mount designs, lift the bottom shelf from the supports, pull it forward, tilt the front upward to a vertical position, rotate it at an angle, and guide it through the opening.
How do you remove the shelf above the crisper drawers?
Remove the crisper drawers first. On many KitchenAid models, support the glass insert, press it upward from beneath near the center, then slide the glass forward. After the glass is removed, the cover frame can usually be lifted from its supports.
Can you remove the glass from a KitchenAid refrigerator shelf frame?
Some shelf frames allow the glass to be separated, while others are intended to remain assembled during routine removal. Check for visible release tabs and consult the model-specific owner’s manual before prying the frame.
How do you remove an Infinity Slide shelf?
Retract the sliding glass section first. If the full shelf needs to come out, support the movable glass while lifting and tilting the shelf so it cannot slide forward unexpectedly.
How do you remove KitchenAid refrigerator door shelves?
Many door bins simply lift upward from their mounts. Drop-in rails also lift straight up, while snap-in rails may require releasing tabs at both ends.
Can KitchenAid refrigerator shelves go in the dishwasher?
It depends on the shelf and refrigerator model. KitchenAid recommends checking the use-and-care guide. Hand washing is generally a safe choice, and shelves with under-shelf LED lighting should not be placed in a dishwasher.
How do you reinstall KitchenAid refrigerator shelves?
For hooked shelves, guide the rear hooks into the shelf supports, then lower the front. For sliding shelves, align the shelf with the tracks and slide it completely past the retaining stop. Confirm the shelf is level and secure before loading food.
Final Thoughts
Learning how to remove KitchenAid refrigerator shelves becomes much easier once you identify the shelf mechanism instead of trying to pull every shelf out the same way.
For a standard sliding glass shelf, the key is usually slide, stop, lift, and remove. For a framed shelf, it is usually tilt the front, release the rear hooks, and lift out. French-door models may add another step: positioning the doors correctly and rotating the shelf vertically to get it through the opening.
If the shelf will not come out, do not force it. Check the stops, rear hooks, door clearance, shelf mounts, and any sticky residue in the track. And whenever you are handling tempered glass, use both hands and allow a cold shelf to reach room temperature before washing it.
The extra care takes only a few minutes and it is much easier than replacing a cracked glass shelf or broken frame.

Hi, I’m the lead researcher and appliance enthusiast behind RefrigeratorSolve. With years of hands-on experience troubleshooting cooling systems and testing home appliances, I am dedicated to bringing you honest reviews, energy-saving tips, and practical solutions to keep your refrigerator running perfectly.